
Today I am going to for fill another promise... I am going to show you another way to use the corner punch... if you didn't do the first tutorial on corner punching I would suggest that you try that one first... but you be the judge on that... just hope you can understand this..
I had quite a few gals leave comments and also write to me that they loved it... so I hope that this one will do the same..
Please let me know...
Thanks...
My e-mail address is bongem@earthlink.net
so you can drop me a line there too. Thanks..
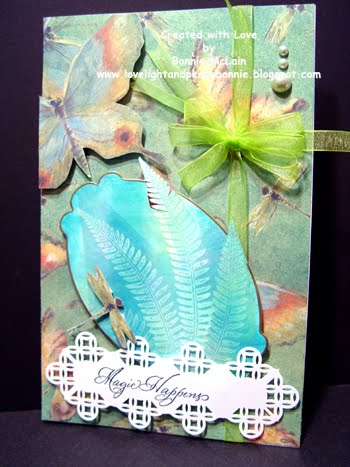
Okay.. .I made a few cards using the punched strips... so that you can see how I use them...
So I am not going to go into details about the cards.. just enjoy them... but look at the punching... that is what we are going to focus on NOW!!!


Love that Cuttlebug Pumpkin... do you have it... drag it on out... Fall is on the way..

Okay... you will need
3"x8" strip of paper...
A corner punch
A pair of scissor...
( long is better.. you need to cut straight across ... and the length helps.. )

1. Start off by punching in the center as shown..

2. It will look like this (more in focus) when punched..

3. Now with your scissor... cut across in the direction of the punch...
These words might not be the right ones... but look at this picture and put your scissors in the 'slit' that the punch made... and cut across...

4. It should look like this..

5. Do it again to the other side... and you should have this shape..

6. Now punch lining up the edge of the paper... as we did in the other medallion...
NOTE: Each punch is so very different.. due to the design etc... so you have to make adjustments with each one... With this one... you have go into the punched area to make the three punches...

7. It should look like this when done..

8. Now do the other side... lining up again the same as much as possible as you did the other side... That is really the trick to this whole thing... what you do one side.. .you have to do as exactly as possible on the other side..

9. I did have to overlap with this punch.. but with most you don't have to... just play it by ear... this is after all only a 3X8 piece of paper... not the end of the world... start over if you make a mistake... Trim off the mistake and start again... as you can make this 'strip' any length you desire... if you notice in the cards above... some of mine are only a couple of punches... while others are longer...

10... It should now look like this..

11. Now we are going to go the length desired.. you have to line up the punch with the previously punched area... if you look very closely at this picture, you will see the tiny little black area over in the far lower section of the punch....that is from the last punch.. line it up... and punch going down the length of the strip..

12... Like this..

13.. Continue down the length as far as you want to... but leave enough room to finish this off..

14. When you have come to the end of desired length... again CUT THE PAPER in the direction of the slit...

15. It will look like this..

16. Now you are going to again line up the edge of the paper... and also using good judgment punch the end punch... If you will notice... my paper didn't quite line up... but I had more than enough room to straighten out the punch.. .

17. Then start down the other side... lining up as closely as you did on the other side..

18... The first punch going down the other side..
 19... Punching down the side
20... Final punch... all lined up and making sure that I am good on both sides now.. .
as this will make it look even..

21... Finished!!!!
One thing to remember...
Practice makes perfect...
Keep on trying..
and then try again..

I have done a few with other punches... just so you can see them... sometimes when you follow the punching it makes it easier..


I hope that you have enjoyed this tutorial...
I love these on cards, bookmarks, scrapbook pages, gift tags... all kinds of projects... so cute and versatile in so many ways....
Have a wonderful day...
Don't forget to visit my store...
TOYZ 4 PAPER
More coming on all the time... so check often..
I live... I create.... I am...
Love, Light and Peace....Bonnie
Okay Bonnie, I'm off to try, looks easy enough, you are a great teacher lets hope I'm 1/2 the student LOL.
ReplyDeleteYour tutorials are fabulous, Bonnie!! this time I'm gonna give it a try!! sent my Nature set on Friday........got an additiional one for our last gal! Hugs, my sweet friend!!
ReplyDeleteThanks so much Bonnie for yet another fantastic tutorial. You are the GREATEST!
ReplyDeleteHi Bonnie! I found you through Olga's link. Great tutorial, but there is no way I'll be trying it. It would drive me absolutely crazy!!! Your work is gorgeous though, and I wanted to tell you how much I love the photo of you and Glenn. You both look so happy!
ReplyDeleteAnother great tutorial - that silhouette card with the pumpkin...gorgeous girl! TFS!
ReplyDeleteWonderful cards and tutorial, Bonnie! Hope you are feeling better and all your puter problems are fixed! Thanks for sharing!
ReplyDeleteWOW! Totally gorgeous and fbulous creations, Bonnie! Your tute is fantastic, too! You are amazing with these punches! Fabulously done!
ReplyDeleteAwesome tutorial and the card is Stunning! I will have to try this when I get home!
ReplyDeleteWhat a fun trick Bonnie! I'll have to try it while I'm looking at your great tutorial!
ReplyDeletethis is a great tutorial bonnie-your instructions seem easy enough to follow-I will let you know when I try it-love the embossed pumpkin card-does cuttlebug still make that pumpkin?
ReplyDeleteWow these are incredible. You are making me WANT to buy more corner punches!!
ReplyDeleteOh, Bonnie, your box, cards and tutorial are great! Saw the box over on the cuttlebug challenge and just loved it! Lightning took out our computer, 3 tvs, and other things last Friday, so I am just getting back online. Good to be back. I feel like I have missed so much! Glad no one was hurt -- all of us were gone at the time.
ReplyDeleteBonnie
ReplyDeleteYou are just the most talented lady. Love your explicit tutorials. They are perfect for someone like me who has to follow things step by step.
Love your site
Myrna