Followers

Showing posts with label Tim Holtz embossing folders. Show all posts

Monday, July 21, 2014

Monday Monday.... what a lovely day of the week...

Today is Monday...  and it is a busy busy day around here... even though it is raining, I am canning up some beans... and threw some blueberries into the freezer...  and made a card... yes ONE card for THREE challenges... usually it is the other way around... but this week is really hectic and I wanted to do something for all three of these challenges... 

Simon Says... I have to say again... THANK YOU all for the lovely honor of  Designer Spotlight...  it is truly a huge honor... and also the Winnings of a $50.00 shopping spree...  WOW... what fun is that...  so Please check out this FUN challenge... and ENTER today...    This week it is Mid Summer Challenge...  with sort of an anything goes type of theme...  for this theme I choose to do summer flowers... one of my favorites...  tiny blue bells... please check out this site and join in on the fun... 

The other challenge is Craft Hoarders Anonymous challenge and they ask that we use up STUFF we have... and get the old things and USE them...  I had to join... I keep on thinking that something miraculous will happen and my studio will become clean...!!!  LOL...  Anyway the theme this week is to EMBOSS...  dry or with a heat gun...  so I did a little of both... I embossed dry... with a tim holtz embossing folder and then I used many different colors of embossing powders all over the paper.. I love the way it turned out...   hope you can see enough of it... I also used little fancy spellbinder pieces on the corners and embossed them too...  so I do have some embossing going on here... I just did the first challenge here yesterday... and everyone seems so very welcoming and happy... I love that...  so here I am again with another piece... as I promised... 

Third.. but not least is the Shabby Tea Room challenge... which I have not done in over two years... I use to have dial up and it was so very difficult to get onto a site... let alone post, and do all that one has to do... so I gave up doing it... and this spring when we finally were able to get high speed... I got on line and started to PLAY... and here I am again...  Hi Debbie...  Okay... the challenge here is to do flowers... and also lace... I have the blue.. but not the pink... hope that the colors are okay... if not, I had fun adding my lace... and will watch to see if the colors have to be the same too... 


Okay... now some of the other things that I have added...  my background paper and the envelope of course I made also... I took Distress inks and put them onto a worksheet and spritz and created the papers... then I took a die cut and made a stencil with the butterfly die cut of tim's... and that is how I got the butterflies...  also used a small group of flowers on the card background... just because I love flowers... 

The center of the oval frame... (which is crackled) I took a piece of one of the green tall plants from the butterfly garden we have on the farm... and brought it home and sprayed it with some Dylusional ink...  I love the results... 

I made all the flowers... and used stamen that I did buy...  in the centers of each flower...  the ribbon is of course seam binding dyed... 

So... that is my card... now I guess you would like to see it...

 
Midnight Bloom 

 
Embossed paper in background and spellbinder fancy corner also embossed 

 
I adore butterflies... and this one I made using Tim Holtz's die cut... cut 100's of them... and painted the all different colors to use... if you want to talk about OCD Karen... we can now talk!!!  LOL..
anyway.. .I generally make the butterflies double... to show them flying FREE... and the underneath one is generally always different...  just the way it is... 

 
Here you can see the difference of the other butterfly...  also the spraying of the tall grasses...  I used sunshine yellow (?) and also a brown... love the effects I got. 

 
Some of the bluebells... 

With a large card like this, I generally try and make a matching envelope... which I did...  paper matches sort of... not the stamping on the butterflies... but colors and butterflies are a match...  


This is what the paper looks like close up... 
 
So that is it... hope you enjoyed this... and thanks for stopping in to see me...  I really love your visits and also love your sweet comments... thanks so very much for both... 
 
Hope you have a wonderful day creating and enjoying... 
Love, Light and Peace...Bonnie 

Sunday, July 20, 2014

Framing the Ancestors

This time on Compendium of Curiosities 3 we are creating Painted Industrial ... which I really call Faux Metal... and I happen to LOVE creating it...  wow... you will see some old things that I had done in the past with this GREAT method... as I really love doing it...

For all the details and also all the EYE CANDY... please go to the site  to see it all...  I really think you should grab some toys and join in on the fun...  Tim's books are for sale on the site above... and in other places... but that and join in on the creations every other week...  what fun.  I love doing these challenges, as it keeps me on my toes...  and I love to see what I come up with... and also what everyone else does too... 

Here is mine for this challenge... 

 
So many times a family forgets where they came from... so I am leaving tid bits around so that our kids can understand who people were in their ancestry...  
 
This is a picture of my Husbands Grandparents... I am looking for the book (family blood line book, which I can't seem to find right now???  ) 
They were married around 1890....  yikes... that is a long time ago... 
 
Anyway... they had four children ...
Nellie and Alton McLain 

 
I wanted to do something special for this picture... as it is really such a LOVELY picture for the time it was taken...  her dress is so very pretty...  and I wanted to show that to the fullest... also the room that this was taken in... 
 
The frame is also a shadow box... about an inch deep.. and you will see why in a minute... 
I used the Faux Metal and created a frame and then also using the die cut, three times with chipboard and once with the faux metal...  to make a thick frame...  I guess you have to look very closely to see that... but the oval frame is raised...  and the back piece is against the panel...  The panel is a piece of paper from the Wallflower collection of paper... love that paper... 

 
I create faux metal flowers too...  and used alcohol ink on them... I didn't want a bright color flower... so I used a pearl white and then put mushroom dye on top of that...  I think they look a little vintage... which is what I was tying to create...  since this picture was well over 100 years ago... LOL...   


I put one on the top too...  smaller flower... these were cut from the Tattered Floral die strip by tim...  I have had that one for a long time... and really just started to use it a lot... love all the different flowers on that strip...  and of course the leaves...

 
So here is a closeup of the frame... 

 
I had to make this picture lighter, so you could see the ribbon and the little locket in the box... 


In here are the names, marriage date, birthdays of the 4 children and it will be kept with this picture... hopefully one day, someone will cherish this as I do.. 


NOW... here are some other items that I have made in the past with this WONDERFUL technique... I really do love this technique... and do use it a lot.. 

A frame...  the flower is embossed with the color... 

 
I made this for my Mom's 93rd birthday...  she just recently passed, and I hope that I will get this box back...  I love the different looks you can get with this technique...  that is why I am showing all these... 


Well you know me... more is always better... LOL.. .so here are a few of the boxes I have made... one year, I made all the men a box for Christmas... with a nice gift inside of it...  love it... the girls got the flower ones...

So Thanks to Linda Ledbetter and THE CREW...  for all the inspiration and love that they give to each of these challenges...  and also to all the people that give wonderful prizes... like Tim, Mario and Inspiration Emporium... thank you one and all... you are all great... I love all these super duper challenges... 

Hope you all will take a look over at the site   so you can see all the wonderful eye candy...  really some really good ART... 

Have a wonderful day and be creative...  Thanks for stopping by for a visit.. and see you tomorrow with more challenges and more fun...

Love, Light and Peace...Bonnie 

Thursday, July 10, 2014

Butterflies and Flowers...

Over the past couple of days, I have been doing a lot of soul searching and meditating... as well as playing with special things... one of them has been playing with modeling paste and Butterflies... and the other has been FLOWERS... what else is new with me??? 

LOL... I love both of these... so it was a very introspective time... very loving to self to take these times and enjoy something that you just haven't taken the time out to play with also.. .

Well I had these butterflies of Tim's, that I love... but wanted to change them a little bit... so I tried the modeling paste... and made about 25 of them... love each one...  tried all kinds of things, like water coloring them, zentangling them, and leaving them plain and using them as backgrounds... so very much fun... then I started to play with the border Butterflies... and had just as much fun with that... you will see...  I have examples of both... 

Well... after  a few days of this... I needed a challenge to enter... something that would allow me to use these in a way that was not my idea .... but something that I could do with these...  So I went looking... and found another CHALLENGE... 

It is called Frilly and Funkie...  wow... go take a look... all kinds of things... but both styles... FRILLY and FUNKIE... both of the things that are fond to my heart...  so... I had to do something for this ... but since I love both... which am I going to do...  ANYWAY.....the theme is to use bright summer colors and adorn with a FLOWER...  no problem... love this... what fun I am going to have... 

Well for those that know me... I am a little on the compulsive, obsessive side of life... and very prolific in creating all kinds of things...  sort of the have to do it type of thing... just love it all..  and what do you do with all this 'STUFF"..???  ENJOY each and every piece of it... that is what you do... 

Anyway... here is what I created... 


For my FRILLY...  Earth Laughs in Flowers... 
Love that saying by Emerson... and so I wanted this to be frilly, but not overly so...  wanted it to look a little fussy/frilly...  and so I used Tim's Die cut was cut on the fold... so that I had a much larger piece of Trellis to play with here...  and then I used a Spellbinder for the 'frame'... to create a garden like feeling... 
 
The top tag is also a Spellbinder and I stamped my little saying on it... along with .... drumroll.... a butterfly...  made with modeling paste.. and then colored in the Tim Holtz way... using my distress inks...   

 
A little closer view and you can see all the raised parts that are randomly done.. and the color the same... 
 
The background was created using my work sheet and then embossing with a Tim Alterations embossing folder... 

 
The FLOWER...  well I used... the TATTERED FLORAL die... is there any other one... love that die cut...  I do have other flower die cuts of tims... but do love this one the best... 
 
I used Dylusion inks... wow... if you ever need COLOR... it is there... one spritz and you are colored...  I used all the reds, pinks oranges and yellows... but I have to tell you that I really love to use the bubblegum pink and the yellow to create color on the paper...  I love the blending of those two... my fav... 
 
I also made a layer of the flower using pickled Raspberries... which goes right along... and then because I was over in the Distress ink area... I also used Ripe Persimmon... oh my... what a color display... it will never come out of my hands...LOL.. I love it all..  So that is my FRILLY one... 


I had to do a Funkie one too... 
 
I used a lot of stencils on this background prior to having fun on the front of this...  I tore up some papers... and book pages and stenciled them... and then also had fun with the border butterflies...  more on that in a while... 


I added a few words... CHERISH EACH DAY.... as each day is so very special and we need to really appreciate all that we had and that is around us in all ways... 


Okay... back to BUTTERFLIES
I used the border die cut... and cut it out of cardstock first... then a few book pages... then a few butterflies using the shakers and movers.... which are sort of the same size...
 
I added some of each to the original cardstock... and loved what I saw happening... layers upon layers...  I told you I have been playing with these... and had done a few of these... in all different colors...  this one fit the bill to use BRIGHT ... and a FLOWER...
 
I added some of everything to this border... and loved it..  
 
then I zentagnled a little butterfly for the others to follow out of the row... LOL... love to add a little imagination to my things...  


So there you have it... butterflies with a FLOWER... 
 
hope you enjoyed these... I sure had a blast making them... and I thank you for this challenge and allowing me to join in...  hope to see you this coming Wed... it is marked on my calendar...
 
Thanks so much for stopping by for a visit and hope you all have a wonderful day...
Love, Light and Peace...Bonnie 


Thursday, July 3, 2014

Tim Holtz's July 2014 Tag.... SUMMER TIME

What a fun time I have had with THIS challenge...  so much fun... I am excited to share it all with you... 

I have a FEW projects... and each one I really enjoyed making and creating... a little bit here and there...  and all of a sudden I have quite a few tags, projects and having more and more ideas...  so I finally created one that I really really loved... and that is good... as now I can say I have done this challenge...  Hope you like these...

 
Okay... this is the LAST one I did... and I am showing you this one first off... as I like it the best...
But more on it later... 
 
 
DSC00428
 
Here is Tim's tag... it is really a great summer time tag and all the techniques are really fun to use...  so I wanted to try it out... 
 
I had the Mini stamp set of the seahorse... so I had to put on my thinking cap...  hummmmmm.....

 
Okay...  I can draw a large one... and then use the stamp set to create the babies... following the daddy seahorse...  yes... that is what I will do... 
 
So I did this tag... 

 
I have to say that I got so very excited about creating the SAND .... that I had to use a few smaller tags first ...  and then the fun really started...  so now I had 4 tags started... do you see what is happening...???  Oh well... I was waiting for the crackle to dry and one thing led to the other... 

 
I really love the bright colors on this tag... and these little seahorses are great too... love the daddy one...

I really had fun making the seaweed... I used the branch from the pine cone die cut... and then embossed many different GREENS onto them.... then I added dots of stickles glitter glue...  and also the turquoise is distress glitter...  when I went to put them onto the tag, I was able to fold and create the look I wanted, as I had done this to both sides of the branches... 


These are shells that were collected by My Mother many years ago... she would be happy to know that I have used them on a tag like this.. . love this sand stuff... greatest thing since sliced bread... LOL... love it... 

 
Okay... when I was trying to think of things I wanted to create for this tag... I thought about making some shrink stamps and putting them into an ideology bottle... but the one that they would fit into... I USED THE DAY PRIOR!!! On my White on white creation...  oh my goodness... Anyway... I had another great idea...
But this is what they looked like after I stamped them... and then heated them up... 


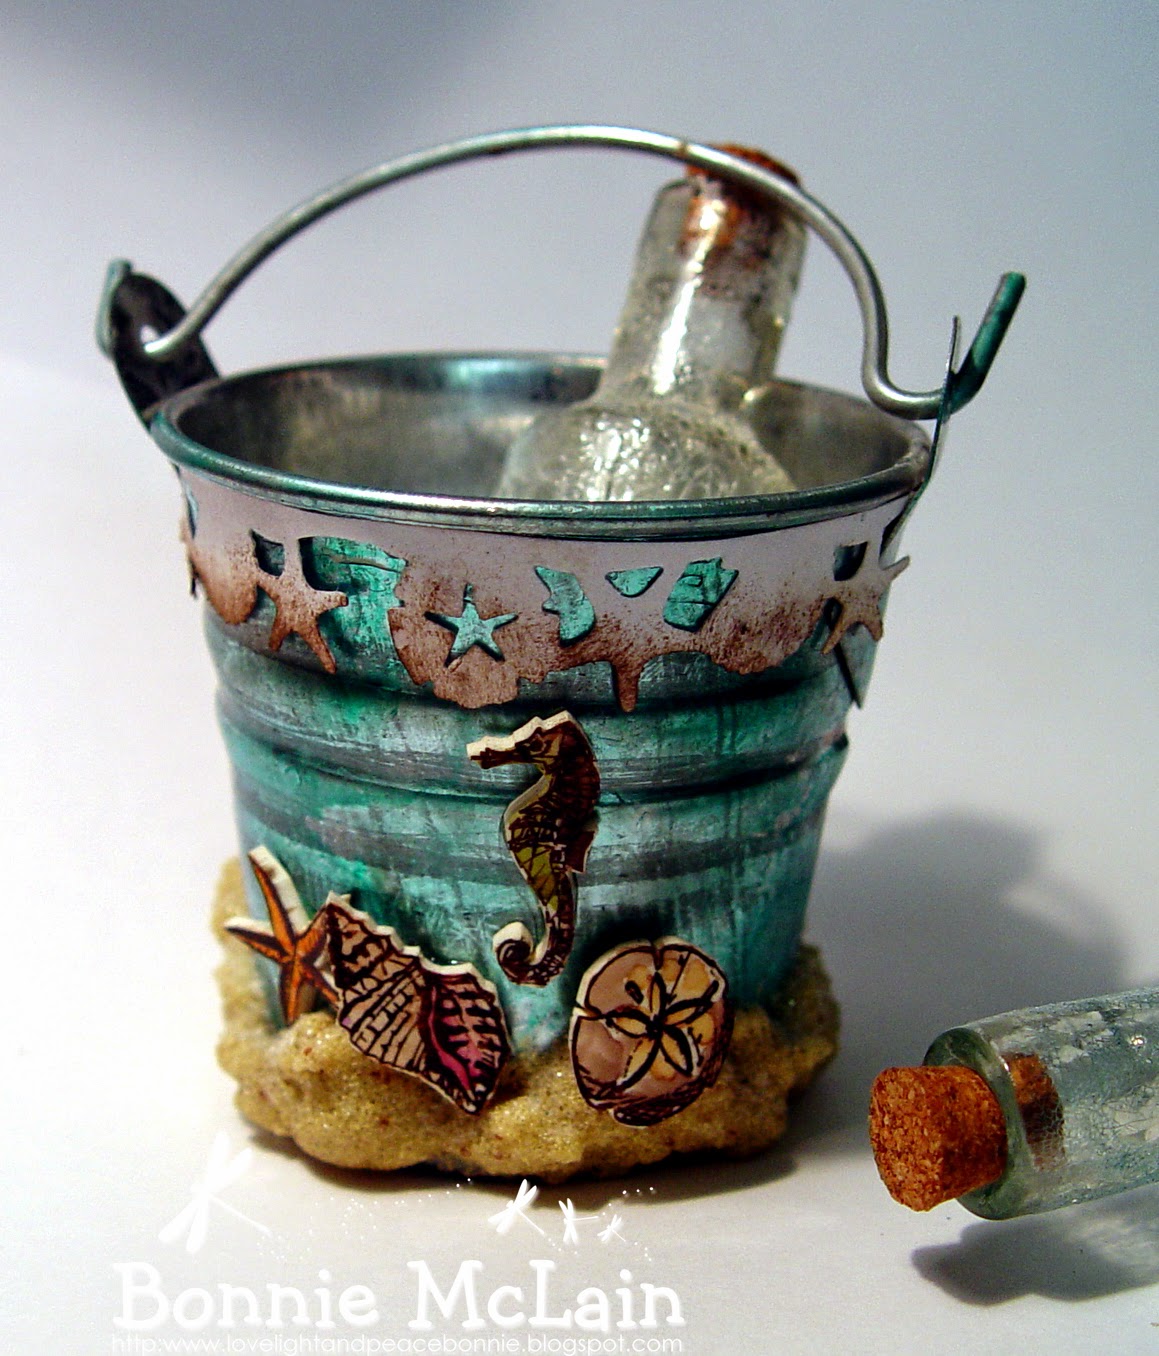
When I was a child we spent our summers at all kinds of beaches... My great grandparents lived in Maine... and so I spent at least three to four weeks a summer in Maine...(all family)   and then on the way home we would stop in good ole Cape Cod for a vacation...and then since I grew up in New Jersey... the JERSEY SHORE was the place to BE...  But as a child... I had to have a sand bucket... it was used for all kinds of things... so summer meant a 
NEW BUCKET... 
 
Here is my NEW BUCKET...  
I colored the little shrink figures after I shrank them...    

 
Here are the only two bottles I have left... and the little pieces wouldn't fit into them.. have to buy more ideology to get them...  love this little bucket... it is only about 2 inches tall... love it though... 
 
 
Okay... I still had all these other tags with sand drying on them... what was I going to do with them... I couldn't let them be undone... so I started to play... and add things and before I knew it ... I had made about 10 more beads... 


I cut my papers out of paper I created with Distress inks... and then rolled it ... and then EMBOSSED IT...  and added some JUTE to it too... left over pieces from my other tag... a few little beads... and I had my top of the tag... 


So here is the tag... with little flags on the side...  and the sand pipers looking for dinner...  and the gulls in the air... use to love to feed the gulls... and also collect star fish... 


Another tag... double... but had to use this wild piece of grunge board that I found in my grunge drawer... it had the perfect swirls all over it... and I added the little seahorse too...  and these beads are really my very favorite ones I have ever made... love them...   


Okay... here are some more beads... and also some more shrunken pieces... and the sandpiper is looking to have them for his dinner...  yikes...  love the sand ... 

 
a close up of the other pieces... 
 
 
But after making all these tags... this is not
 MY SUMMER NOW
 
I use to go to the beach and enjoy the surf... but now I live in the mountains and enjoy the mountains... all the time... I love the color of them... the scenes are always fresh and alive in my world... and I love it...  all of it...  I have found peace here in
Western North Carolina  
 and enjoy it all... so with that I present my summer here in WNC ....


My Husband and I bought this farm 12 years ago... and created an organic farm and oasis here...  it is where we live and enjoy our lives together...  so our farm is on one side of the road... and across the street is our home... which is where the back acreage is all pine trees... and it is deep...  so I had to create a pine forest on my tag... which I did... and I also used the Tall pines embossing folder for my plastic piece... love it... I think you will be able to see it in some of the other photos... 
 
I added flowers... as they are ME... I love making, growing, and picking flowers... most of our flowers though are over on the farm...  but that is okay... these are climbing on a trellis...  and I love that...  (used the tattered flower garland for mine on this tag) 
 
I also LOVE butterflies and we have quite a few butterfly gardens... all wild and natural.. with tons of milk weed for them to leave their eggs on for next year...  blue birds sing to us all day long...  so I added a blue bird...  All of these are die cuts of Tim's .. and so is everything else that was used on here... 100%... 
 
So lets see some more... 


LIVE ... I dream and live all day long... or I live in our dream all day long... no matter how you say it... living ones dream is perfect and what it is all about... 
 
Oh you asked why the orange at the bottom of the tag...
Well in Western North Carolina we have ORANGE soil..  terra cotta plus...  clay and a little regular soil... 
 
The butterflies... I tangled and colored with my distress pens... love doing water color with them... 

 
You can see my tall pines here in the plastic embossing... we have tons of tall pines...  Can you see the little fence.. .I did crackle that...Love it... sorry I had to cover it up with flowers... but they kept on growing... and I couldn't leave them off...   

 
Dreams are in purple... blues, whites, and pinks...  all favorite colors... of course the green is also on here ... so I am totally in my muse with these colors... 

 
There is not much blue sky... as the tree canopy really covers most of the sky around our house...  but I can see birds flying... can you...  and also lots of trees...  which I colored with a few mini misters that have perfect pearls and distress inks in them... love these...  always ready to use for me too... 
 
And check out that wonderful blue butterfly... 


I used my air brush tool... ??? can't think of the name of it right now... duh... anyway.. .I used it with a walnut stain marker... and it created all these little specks all over it.. .love it...  had a hard time learning how to get the pen into it correctly... watched videos and finally ... FINALLY got it... and now a great TOOL...

 
Love  the way the BLUE one turned out... so perfect... 

 
Any my little BLUE BIRD... 
  
 
So I will end with the way I began... and hope that you have enjoyed all these projects... I sure have... and now as my friends say... what are you going to do with these...  Well they go into my private stash of GOODIES... as I love them... 
 
Hope you have a private stash of things that you have made that you love...  and also that you have a perfectly wonder 4th of July to all Americans... and a great Summer day to everyone... in the entire world...  love you all.. and thanks for stopping by here for a visit...
 
Love, Light and Peace.... Bonnie 

Saturday, April 26, 2014

CC3Challege.... Soar with the Angels

Today is the first challenge of Compendium of Curiosities 3... and I was very excited to hear about this challenge, as I love using all my Tim Holtz 'toys' and goodies... and also I love doing nice challenges... also I finally was able to obtain HIGH SPEED INTERNET...  So I am so very excited about that...  it use to take me over 2 hours to get 5-6 pictures up on my blog... and towards the end I couldn't even get onto my blog... so my life was becoming very limited on line... but NOW.. wow... what a new world has opened up before my eyes... It would take hours to download a new blog or website... and most were impossible to do, as there were too many pictures on them... so I am so very happy in many ways to be able to join in on this challenge... and others too I might add... 

Well this challenge is unique.... you can find all the answers to all your questions... HERE     Linda is so very GREAT to do this challenge and this year she has added a whole crew of talented and great people from all over the world to help with this challenge...  what a great person she is... Yeah for Linda and the CREW...  I am really looking forward to this challenge every other week... 

Okay... so here is my piece using this weeks challenge... 


This is my finished piece... but I will go into each section with as many details as I can remember...  you see when I start to create I create.. and not too much stands in my way...  as far as color names, products etc... I PLAY and have FUN...  main goal.. 


I started off with my marbleized paper as per Tim's directions oh how to make marbleized paper... that was so very much fun, and I had to use up all the 'stuff' on my sheet that I made over 10 pieces of paper...  oh wow... not to worry I will use them all... but this was my very favorite one...  so I went over to my other table to proceed with the creation..... mind you.. each table is totally covered in debris at this time... what a lovely mess I made... 


I have to tell you that this piece will be put into a scrapbook that I am making of my mother growing up...  there are so very many cute and wonderful pictures of her... I need to do that for her...
 
My mother just passed into the next experience on February 8th of this year...  she was 94 years young... she had some physical problems... but was full of life in so many ways... she wanted to create more of her art every day... it became a huge frustration for her as the days went by... she was almost blind, (macular degeneration) and yet wanted to make flowers, and make cards for friends and others...  but just couldn't see at all.. 
I should tell you that her name was Vivian Prince Riley Nelson  and her mom was Eva Mae Prince Riley...  who was a very loved woman in many places all over the east coast of the USA...  she grew up in Maine, went to college in Boston, and then got married and off to Florida where she opened a music school to teach others how to play the piano.... she had made her debut in Carnegie Hall NYC when she was first out of college...  a very proud, Victorian woman.  I loved her dearly as my Nana and mentor in life in so many ways. 
 
This tag represents so much of what I am writing about...  for those who are actually reading this... 
The ANGEL is looking over them all the time...  (to create the angel, I used Picket fence distress stain on my stamp and then stamped over it with Gathered twigs... )   love the look I got doing this...
 
The chicken wire is a stamp... 
 (of course it is TIMS...  what do you think ??? )  
and it represents the fact that they were both able to learn a lot in life and move onto the next experience.. where they are hopefully very happy and creating again...  My Nana was a wiz in the kitchen... making a cake with a pinch of this and a handful of that... and then would go out and work on a handmade dress with a lace collar that she had made too...  so very talented... 


This little bird is not just a simple little bird.. 
First off I put some frosted film onto a piece of recycled plastic from something... and on the back after it was cut out with the bird and cage die set...  I used my alcohol inks to color it...  I have a palette and used my solution pen to get the stroke marks on the birds body...love it...  how cute is that saucy little one... 
 
The bird stands for my Mom and Nana's love of birds... pretty colored birds that they would love to look at...  both were fascinated with the colors, flying ability of the bird and also loved to feed them. 

I used a Cabinet die cut to make the 'frame' and then used an embossing folder to create the design on it... one of TIM's folders.. but the name sort of escapes me at the moment... LOL... I think it is about 8 years old or sooooooo .... 
 
I put some butterfly wings in the back of my Mom who was about 2 years old at this time... so this picture is about 92 years old... and my Nana was about 28 years old...  but I am not really sure about that age.. would have to look it up... ??? 
 

Anyway... I put the butterflies behind them to show that they were part of the angles who protect me in my everyday life here on the Earth Mother...  and they do soar quite a lot... as they are kept busy in so many ways... 
The flowers I made with some of the marbleized papers that I had created... YEAH... you see I already have used some of it...  and then I attached some Rock Candy Distress Glitter to the flowers... had to show the glittery side of my Mom and Nana...  and the little pink bow... one of their favorite colors...  My Mom also loved Green... but really loved all colors.. my Nana loved Navy and blues the best of all... 
 
The little lace at the bottom of the frame... is only about 60 years old...  LOL... I have a small bolt of it left.. from my Nana's sewing... 

 
But I made the flowers yellow and pink... I have to tell you that the colors I chose to use on this piece were Squeezed Lemonade, Peeled Paint and worn Lipstick... as they were the only distress paints that I had...  I had loaned a bunch of my other paints to a friend for the week-end... not thinking that I would be using them for this challenge...  LOL...  so it was a tough one... not my favorite colors together... but I do love the green and pink... 
 
The hand... is pointing to the word SENTIMENTAL... as this is sentimental for me...
 
 
So looking at the whole piece again... you will see two large wings... I love these wings and don't get to use them that often... but LOVE them...  a Tim Die Cut... 
 
And they are for the whole memory to be lifted high into the heavens to send love to My Mom and Nana whom I miss and love VERY VERY MUCH.... 
 
So that is the general idea of my ART for this challenge... I will be adding this piece to a page that will have other art on it...  I will post that when I do it... but it will be a while... that is for sure...
 
Hope you have enjoyed all of this... and that you join in on this wonderful challenge... 
 
Thanks so very much for stopping by for a visit... and hope you have a WONDERFUL CREATIVE DAY....
 
Love, Light and Peace.... Bonnie