Followers

Showing posts with label Spellbinders. Show all posts

Friday, September 12, 2014

Frilly Hearts in Victorian Velvet

I should have been blogging today... but instead I played all day long... wow... I had a blast and made quite a few things... so many people ask how I get all the things done that I do.. well I dont' stop and share when I should... LOL... I hoard up the projects and then I take pictures of them all... edit the pictures, and then post them all...  wow...

Anyway... a different way... but what the heck... it's my way.. 

So here is a card... but first off I have to give CREDIT where CREDIT is due.. 

the other day I was reading this BLOG... and this technique really hit home... as it is always a problem with me... you use this great Texture paste... and then you have to wait for the stuff to dry... well I can't always do that... my mojo is not going to wait for any texture paste to dry...  well PAMELLIA JOHNSON did something really fun and neat... she embossed it when it was wet... LOL.. how simple and how fantastic is that...  so I tried it... and after I did it once I did it a few more times... it really gave the textured paste a HIGH look.. I love it Pamellia... and thanks so very much for this GREAT new speedy experience... we are on the same page girl... love this one...  in my techniques now... 

Okay... keeping that in mind I also made this card for a few challenges... 

Frilly and Funkie... I did a heart card all in RED... not really vintage or shabby chic... but I got the card done for my son's birthday... but this is the REAL Shabby Chic one...  It's all about hearts this fortnight over there... so get out the hearts and join in... 

Craft Hoarders Anonymous   Stop hoarding the flowers and use them on something...  anything... just use them up... NOW... okay... so I used some more...  made from Coffee filters that were sprayed with Distress Inks...  love it...  more flowers used... (You know thought that every time I use some from the drawer ... I have to make more...  policy in this studio... LOL) 

And a new challenge...  since I love dragonflies, I had to join this one...  CRAFTING WITH DRAGONFLIES...  The theme this time is Girly and Lacey...  so I think this card fits into all these challenges... 


Matching envelope on this one..  from wall paper sample book... thanks to my dear friend Sheila...  love these envelopes... they really as sturdy and lovely... 
 
the card is an easel card also... as you will see in a minute... 


I used a slight cream cardstock for this one... and used MS Deep cut border heart punch for the side... and then used the scalloped Spellbinder hearts and ran them thru a swiss dotted embossing folder... used Antique Linen distress stain on everything...  even the ribbons... 
 
See that lovely back ground... go on over to Pamellia's blog and she will give very good directions...  you will love it too.. If you are not familiar with her work... it is wonderfully stunning and so very loving... each piece is really pretty...  100%   

 
I wanted the flowers to be delicate... so I used some from my flower drawer that had been made from dyed coffee filters...  used ones too.. not new ones mind you... USED... 


I really needed 7 flowers... and could only find 6... but when I back to the magical drawer where all the flowers live until used... low and behold... another flower.... just perfect for the lower section of my easel card... 
 
The background on this section I used my gothic stencil and some Victorian Velvet on a foam pad... perfect for the look I wanted... muted and soft yet you can see it... 


Sweet flowers and a pretty bow made from seam binding... 
 
How sweet is this.. .I would love to receive this card from a friend... so I guess I will have to send it to one... 
 
 
Thanks for stopping by for a visit today...  and I really love it when you stop in for a tea and also leave a comment...  which by the way I cherish them all.. and if you leave a comment on a winning project... I copy them all and it stays with that item... as I really do cherish them all..  thank you so very much. 
 
Hope you have a wonderful day today...
And enjoy each and every second of it... 
 
Love, Light and Peace...Bonnie 


Saturday, September 6, 2014

Tick Tock, finally got one done


Hi …. Today being Saturday might not be the best day to be on line… but I have some time this morning… and am taking full advantage of it…  YEAH…  It is a clear… hot and HUMID day here in the southwestern part of North Carolina… but it is still summer here… it doesn’t know that we are suppose to cool down now that it is September… LOL.. it is starting to get warmer and warmer…  not a thing that I like…  but hey… I do enjoy my mountains… 


So today I am sharing with you something that I have been waiting to make for a few years now… not kidding… at times I am just not motivated to create certain things… and when that happens, it doesn’t get made… about three maybe four years ago, my neighbor and I were down HITTING Hobby Lobby and I bought 3 clock movements…  I was going to make clocks for the bedrooms…  right… I still have them… and other than value, they had a little dust on them too…  but that is okay… they were still in the original containers… LOL…  but out of the bag… and into a drawer, where I couldn’t see them staring at me… 


Anyway… this challenge on A VINTAGE JOURNEY  sort of got things going…  the challenge is to use a FLOURISH…. Now what am I going to use a flourish on… think …..think….. think…. OH maybe those clocks… oh wow… and a piece of paper that I had made using Astrid’s method of using textured paste and stencils… I think you will be able to see that in the background… I am sorry to say that I didn’t take any pictures as I was making this one… but you will see more than enough…


So with out more ADO… here are the pictures I have taken of my CLOCK… 


Starting at the top left and working clock wise around the clock...  what better way... 
 
I have used Coffee Filters for the flowers… two different styles of flowers…  so the color is very soft and natural.  I love using these coffee filters for all kinds of things, but for flowers they are so pretty…  sometimes they are darker, only because of the fact that the coffee has stained the filters… 

 
These little dark brown stamps, are vintage watch throb pieces  from way back… I just love them… and found them also in a stamp drawer… wow.. .I have to tell you that I joined the challenge called Craft Hoarders Anonymous… and I am so very glad I did… they have gotten me to move on cleaning out the entire studio… it it pounds lighter… and far more organized than it ever was… (I am obsessed in some ways… it has to be put away… but in other ways… it doesn’t have to be organized as long as it is in the right place… getting it done deeper feels better… and I am finding so many GREAT things… that I had forgotten… yikes… I think that was a confession…  oh well..  truth doesn’t hurt.. it just helps you GROW… 


This is a small piece of tatting that my great Aunt created… I come from a long line of women and men that used their hands to create with on a daily basis… this great AUNT use to live in Brooklyn, New York… back in the day … and would travel into Manhattan each day on the subway… and she would crochet or tat something all the time… it was a long comute for her… and she didn’t like to waste time… she made many wonderful pieces of crocheted ART.   All with very, very thin threads and fiber.  So  Thank You Aunt Bessie… I love you, and miss you. 


I love to make these little 'pockets' of goodness
at different places on my projects... 
this one has a tiny little flower,
some stamen,
and some gauze...  love it..   


This picture shows you the glory of the textured paste that is all over the clock.. 


As you can see there are lots of flourishes all over the clock face... turning corners, sides etc...  love the way you can DRAPE them where ever they want to be... 

 
Layers of Spellbinders create a face for the clock movement...  of course with some darkening to them... 

 
This printed paper, is by Authentic and I only bought one piece... (not in the correct brain at that time?)  and so I had to use it very carefully for this project... I love it...  and I actually had some left over for a few accents on other things... 
 
Also I used some gesso on the feet, and then used Archival inks  in Potting soil and one or two of the blues???  can't remember how many I used.. I have them ALL...  nothing obsessive about me... 


Again the finished clock... 
Which will be in our bedroom...  and I love it.. to say the least... one down... and two more to go...
So I am looking for another challenge that will suit making the one for the quest room and also our den... 
 
Thanks so very much for stopping by today for a visit... I really enjoy all the lovely comments too...  thanks so very for leaving one... or two or three... 
I cherish each and every one... 
 
Have a WONDERFUL week-end... and enjoy each second of it... and create wildly... and with much LOVE... it shows when you do...  hope you know that... 
 
Love, Light and Peace...Bonnie 
 

Monday, September 1, 2014

The BEAUTY of Fall

I  LOVE the fall season... the colors are all so vibrant in the trees and it is yummy plus... the smells of fall arrive prior to the colors all being gone...  the smell of wood smoke, to keep the chill off in the morning, the smell of leaves and brush being burned by the farmers, as the season is over... cover crops are going into the grown... and the fall veggies are ready to harvest... with winter ones being covered up...  a whole new season of growing.. and in the south it is the time of the year when so many more veggies do grow the best, as the HOT HUMID weather is over.... you wouldn't know that today... it was very humid 80% and the heat was over 93.... very hot and humid....  time to gather up the fan and put one by the worktable and the computer... LOL... truth...  Our home is totally Air conditioned... but I dont' like to use the electric nor do I enjoy the falseness of air on in the house...  like to hear the birds singing... the winds coming up with a summer shower... and like right now all the night time insects are singing to out do the next... love it... 

Okay... so Yes I have been having fun all day... 

Wow... the first of the month and also a MONDAY... yikes... so many wonderful challenges... which to do first...

Well I write them all down on 3x5 cards... and see if I can match any up, and then I start to see what I have on my list to work on this week...  so many things... cards for an up coming sale... birthday cards...  Which... HEY JULIA... it is your birthday in 4 days... on September 5th... Happy Birthday to YOU...  I know you are only 29 this year... but a Happy Birthday anyway... hope if is a very happy one... 
 
Okay... so now you know... this card is for the
and the theme is  AUTUMN COLORS with options of leaves and metal...  I did the leaves.. and also some paper beads...  and of course the Autumn colors... and here is my CARD...


I had made about 50 envelopes from a wall paper book... and this is one of them... I tried to match up the cards with them... this one is so great for a fall card... love it... 

 
My butterfly is made from a stencil from Tims butterfly and then I used textured paste for the butterfly... cut it out and then painted it... and then I added glossy accent over it...  just for the luster...  the leaves are made out of kraft glassine and then inks are of course played with on them... to get the effect I want... 
 
I also used a little white tulle and of course also used my distress inks to dye it... you have to let it dry over night... but it does work...  most likely alcohol inks would be better... but I love the colors of the distress inks... 
 
So that is my card for this challenge... and I am sure I will most likely do something with metal too...  you never know... in fact something just popped into my head... LOL...
 
Hope you have a fun time making things for all the up coming challenges this fall month... it should be a very colorful month...  YEAHHhhhhhh ...  love it all.. 
 
Thanks for stopping by for a visit... and see you in a little while.. .I have a lot more to post... 
Love, Light and Peace...Bonnie 

Monday, August 18, 2014

Dream a Little Dream

This is a challenge that I totally became 100% involved in... in so many ways... hopefully I will be able to convey that to you on a few levels...  No pun intended... just truth. 

I have never been a short winded writer, and this is no different... this is a long posting...  It is something that I had never really done prior to this challenge... it is called an Artist Trading Block.. I have seen them on different gals blogs, but wasn't really sure what they were all about...  so you will find a few places on to go see for yourself...  The creator of these blocks is called Eileen Hull...I suggest you go see all the pretties on that site... as well as these others... and it will give a more total FUN outlook on these boxes...

I personally LOVE boxes... I think that last year I made alone over 200 boxes and must have sold at least 175 of them...  I love them... the ones I didn't sell are generally in my collection of boxes.. I have made all kinds and shapes, with all kinds of decorations on the OUTSIDE...  this time I took it a little bit deeper.. as you will see...

Okay... another site... is called The Artists on the BLOCK... how neat is that one.. a design team with some really WILD creative thoughts that go into action when they start with a blank block... wow... fun and games...

So last Wednesday.. .I went to see what was going on over at FRILLY AND FUNKIE challenge...  and it was all about these ATB... Artist Trading BLOCKS...  I got so very excited and called a few friends to come over and make and create and decorate these fun boxes...  What fun these are going to be... 

But it was Wednesday... and they were not coming over until Saturday... okay.. .I would get started with a smaller box...and so I started on the top box... 

I have taken a lot of pictures... as I have had some gals request more pictures of my projects... so I took a lot... hope this enough... the gals that don't want to see them... can more thru quickly...  LOL.... I love to look at pictures... 

There are a lot of different companies etc that I have used on this project... and I really cant' list them all.. as some are really old... and I can't remember whose they are... LOL... one of the main situations with having too many things...  There are two boxes here and the little one does have a surprise to it...  so very much fun.. .that is why it took me over 4 and a half days to complete... I love this project and will most likely make many more... 

I personally don't have the die.. but I did use another box, that I used for a pattern on the bottom box... which is 4.25 X 3.75 X 4  anyway... that is the way it was...  the top box is 3x3x3xand the entire project stands about 10 inches tall... 

Okay... enough ado ... lets start to show you what I created...

You can click on all the pictures to make them larger... and also there are lots of pictures of each side...  and section... 

 
Side one

 
Side Two 

 
Side Three

 
Side 4 

 
Top area

 
Bought this at the dollar store and took it apart and painted it... and added my own word... and then crackled it... (I ma not good at crackling... either too much... or too little... LOL... but I still love it...) 

 
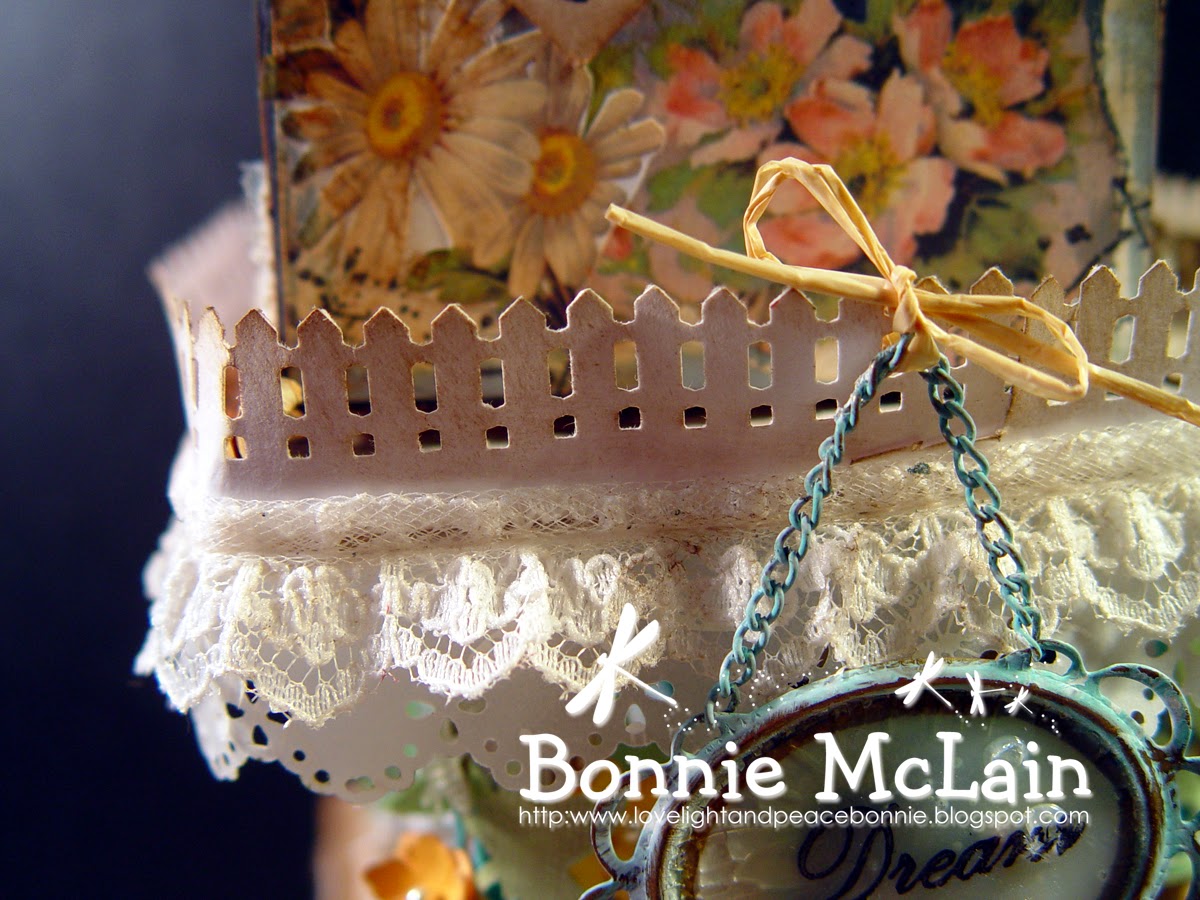
The underneath lace is Velum and I took a picture so you could see that there are dragonflies on the velum... I think I bought this over 10 years ago... and still have at least 10 or so sheets left..  you will see more of this on other projects.. just found this in my STASH... the other lace is real lace...   


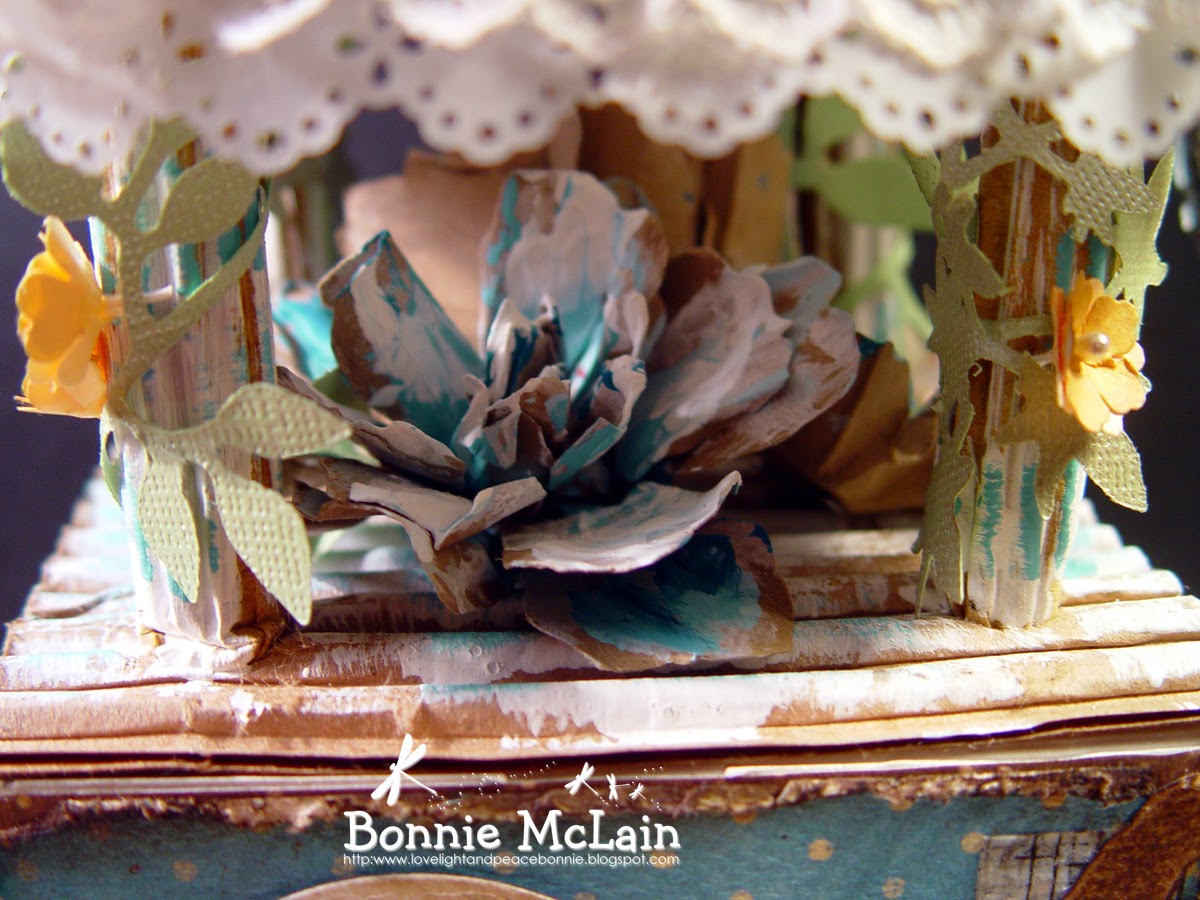
In between the two blocks I had to add a space for some really lovely flowers... Mona Pendleton had these on here scrapbook page the other day and I LOVED them so very much that I made some myself...  to use... and they were really needing to be used... SOOOOO  I built this in between area for these special flowers... I love them...  I used kraft colored paper and then painted them with gesso and pool Adirondack dabbers... love these flowers.. thanks Mona so very much for all the inspiration you give to me...  

 
When building this area, I used corrugated cardboard that I have had for ages also.. it is small corrugated... love it... and used quite a bit of it on these pillars... rolled and then decorated each pillar with some of my favorite little paper flowers that I love to make and also greens from Tim's templates... 

 
I had to have a little vintage fence... this is a Martha Stewart punch...  it holds the top box in place... 

 
On the back side... there is another item on the fence... and it is a layered butterfly with a paper bead that I made for the center of the butterfly...

 
I have had so very much fun making these boxes... just wait and see why I am so very excited... 

 
Three different size flowers are nestled in the between area... 

 
On the top of the platform I used real birch bark that my Daughter in law brought back from the Adirondacks for me... she carried this bark in her arms for over a miles walk... what sweet dedication is that... ???  so I use it only on very, very, very, special occasions... and this was one... the little box will sit on this as a special set of honor...   


Okay... now to see all the close up work on the four sides of the larger box.. 

 
I used stencils and texture paste to create the white on the right side of this section...  and there is birch bark in the underneath area ...  pearls surround the oval picture of some sweet little birds...  and of course my favorite little flowers...  and some dragonfly stamping going on here and there too.. 


Side two 


When I started this project, I laid out about 10 Spellbinders that I thought would be pretty... cut them out.. and started to play... I knew that some wouldn't make it onto the box... but I really desired this window...
 
I have a piece of the birch bark with a knot area... so very unique... and also some Tim tape, branch and a piece of Graphic 45 paper under the top of the window...  a lot of things on this area... 
 
Clip art birds, and a little tag with
A GARDEN OF GOOD WISHES... 


Side Three

 
I had a very difficult time getting the look on this section... I used real vintage music sheets... and they were crumbling under pressure so I had to sort of just leave it there... but the one little bird, did sneak under it... and is peeking its sweet little head out...  I also used paper lace from a Martha punch...  and some textured paste for the stenciled areas.. 


Side Four 

I have  been cleaning out stuff from my studio and also trying to organize things that I want to use for different projects... and so I came across these wooden flowers... love them... had never used any... so here they are... along with a template of swirl and oval butterflies dancing all around in the background...  and of course more little flowers...  I think the last time I made these little flowers I made over 200 of  them... (May be more??? )  and I have to make some more.. they are easy enough to make... a small flower punch and I made some inked paper, of the colors I need in flowers.... and then a hole in the center of each flower... and a stamen put into two flowers.. and glued...  that is it... easy and quick... unless you are making a few hundred of them... 
 
I mixed up some textured paint and added some dye... and then cut out the leaves...  gives me the look I want for these things... 


Now for the little box... 
A friend gave this special little box to me about 8 years ago... I have always treasured it... for many reasons... it had a snowman/ snow/winter theme... and it was just so very cute..  I still have it, and keep it around... so I thought I am going to make one of these...  it is made with a 12 x 12 piece of paper... and oh.... 
 
You will just have to look at the following pictures...  you will see... 
 
The four sides and the top and bottom of the box... 


I put lace all around the lid of the box... and also a little bit on each side of the box.. somewhere... 

 
Opening.... 

 
The innerness of the box... 
 
BE YOURSELF... 

 
When the box starts to open.. you see little tags... and it is going to open up and lay down flat... 


Entirely opened... 
 
starting on the left hand side...  it has more birds... 

 
I have used gesso, textured paste, acrylic paints, inks, stencils, and also stamps and clip art to create this inner being... 
 
Also some spackling tape...  looks like a checker board... or look burlap... love it..  (only about 8 years old... maybe a few more... ????) 

 
Over at the far right is an area, where 8 little tags are attached... the tags are about 1/2 inch wide to 1 inch tall..  I used a single section of jute string for the top ribbon.. 

 
Tags... row one 

 
Row 2 

 
Row 3 

 
Row 4 


Dream a Little DREAM...  and
Just BE YOURSELF... 
that is the inner most message to these blocks... 


I am also putting this into Simon Says Monday Challenge... as it is ANYTHING GOES... 
 
Thanks so very much for stopping by for a long visit... and hope that you enjoyed your stay here...  I really appreciate all your lovely comments and read each one and take it to heart...  love them all.. 
 
Love, Light and Peace...Bonnie