Followers

Tuesday, December 21, 2010

A card for a Friend

Sometimes you just have to make something very special for a very special friend... so this card is just that... but it is also for the Tea Pot Challenge onf SCS.... Mother Mark, asked us to put on our smocks and create a card with our own drawing... so here it is Cindy... all my art work...

I drew the background and the flower... and then colored both... these also can be purchased as Digital images so you can play with them also... Of course they are in Black and white, so you can make the color combination you desire...

This card as you can see is not my usual colors... but I wanted to pick up that burgandy in the background print... so I put that along with the violet and lavendar colors...

Okay... now for some details...

The tag was made with a Spellbinder from Just Rite Stamps... and the sentiment is also from Just Rite... the Butterfly border... dont' you just LOVE that... it is a Martha punch...

The Flower and background can be found at Pretties by Bonnie
and can be yours in a few minutes... so take a look...
Well... this is off to a friend... and I hope that you have a wonderful day... and are getting all those last mintue chores down... the count down for Christmas is still going!!!  So keep on that list of To Do's... and enjoy every single minute of it...

Thanks for stopping by today... and hope to see you back here again... Love, Light and Peace...Bonnie

Monday, December 20, 2010

Christmas Fairy

Well Christmas is almost here... and the count down is going quickly... so I will share one last card prior to Christmas... and this one was created for my husband.... He loves these little fairies and sultry looking gals... so I made him this card... using this bewithcing one from Sweet Pea.... I love this one too...

Our daughter had an all white kitten named Crystal and she was a very very special one at that...

I used a lot of glitter on this card also... as the Challenge for Copic markers wants lots of SPARKLE!!!  So sparkle it is...
The Snowflakes all are in glitter adn also the bottom row of paper lace is all glittered...


A close up show it a little bit better...
Here you can see the glitter....and the gem stones in the center of the snowflakes...

Her Dress also has all kinds of gems dangling and also her had has gold bands... so the entire card is 'lite' up...

Glenn is so very funny, he loves all the cards I make, but loves the ones that he actually gets to keep... and he puts them all around the den .... and they can't be moved... so funny...

Glad he likes them though...

I have a few more cards to share with you... so come on back... as tomorrow a few more will go up... Have a  few challenges I want to do...so stay posted...

Have a fun day... and enjoy your last mintue chores getting ready for the big day... and thanks so very much for taking a few minutes to stop by for a visit...
If you are not a follower, I would love for you to join... as my pile of Blog Candy is getting larger and larger... I need a few more to start this give away... so please join... Love to have you see all the creations I create... Love, Light and Peace.. Bonnie

Friday, December 17, 2010

Happy Birthday to YOU ! ! !

I decided that this morning I needed to take a BREAK from all the other things I have been doing ...getting ready for the week when our children and their families will be staying with us... we are very excited and can hardly wait... so I have been spending each day getting ready... and so this morning, I took a diversion and looked at what was going on with the SCS challenges... and last night I had made a birthday for a friend... and that was the challenge for today!!!!  To take a CHRISTMAS BREAK... and make a birthday card...

So here is what I made... 
If you want to make this type of card the rough sketch is below a few postings... it is really easy to create and a lot of fun 'decorating' the spaces...

I chose to use a few flowers from PRETTIES BY BONNIE    and colored them with my Tombow markers... The center panel background is a Cuttlebug Embossing plus called Chic cirle... and it is so sweet for so many things... I happen to really love this one...

On either side a smaller yet still layered flower... I have used Ranger Liquid Pearls in the center of all the flowers...

The border is a Martha Stewart border punch... what else... Love them too...
So Happy Birthday to all of you... and take a break once and a while from daily things you HAVE to get done... and make a card for someone you love...  Hope that you all have a wonderful day... and thank you so very much for visiting my blog today... Love, Light and Peace...Bonnie

Thursday, December 16, 2010

Christmas Time

I can smell the balsam all over my house.. I love that smell... and ten a lite candle and I am in the mood for Christmas to be here... I love the colors, the lights and all the love flowing all over the place...

I had a few more cards I needed to make, so here they are.. 

I used the Cardinal from Heartfelt Creations... and used my Tombow markers on it... and then used some bundled sage Distress stickles on the branches...

I used the Grand Label 4 for the two Spellbinder shapes... and then a polka dotted Cuttlebug folder for the background...

I made the envelope using my Martha Stewart scoring pad... and lined the card also... using a Punch on the edge. 

This card is 5 x 7 so it is a huge stamp...

Do you have stamps that you don't use too often???  I certainly do... and so I dragged out my Tapestry stamps and created the background on the label 10 Spellbinder...

And then I sponged a green around a scalloped spellbinder shape and then put the red beaded oval on top of that area... to give a white border around the red...

The flowers???? Well they just so happen to be from Pretties by Bonnie and I layered the larger of the two flowers... 

This is a gate card... so the white punched border is on both sides of the other panel... which opens...

Close up of the panel... A friend of mine gave me a fun birthday present... it was a bag filled with all kinds of fun goodies... including buttons, stamps and beads... just loaded to the hilt.. Thanks again Brenda... I love it all.. and here is one of the gold buttons... Just perfect for the finishing touch... 


When you open the card....


Plain and simple... I wrote this out and
the punched edge gives it that finished look...


You will see inside this message... 


I am still working on some other things... but am very busy getting ready for Christmas week... the week after actually when our children and grandson will be with us for the week!!!! Are we lucky or what... WE are so very excited about having them all with us... it will be fun. 

Of course I already have a special place for our grandson to play in the studio, so he get his hands use to crafting... no time like the present ... right??? 

I hope that the weather is not hindering your plans to get things done.. and that you are having fun no matter what the weather is like around your home...Enjoy every minute of your planning and making things just so... Thanks for taking the time out to take a visit here... love it when you come and visit...

Love, Light and Peace...Bonnie 

Saturday, December 11, 2010

Peach, Ivory and Gold

The other day Glenn and I went up to Hendersonville to buy some pots to plant some Christmas gifts in... and when we walked into this store, I was taken with this OUTSTANDING Christmas tree... it was not large...  it fact it was only about 5 foot tall... and it was about 24 inches in diameter.. tall and skinny style of tree... but Oh MY GOODNESS!!!!  Peach, Ivory and Gold... that is what the color theme was... and it was so outstanding that I looked at the tree for way too long... but it was so very beautiful... I would have bought the entire tree as it was, but I am sure that they wanted a very pretty penny for it... yikes... dont' even want to think about it...

Well when I see something like that, I have to create with that color theme...  so I thought about it for a day... and then I sat down and created this card...


Which I have to say I am keeping and using as a center piece for a particular area in the house... along with the Christmas Cactus that is with it... which is also in the peach colors...  That is another one of the things that I saw after this beautiful Tree... I was shopping at the food store and saw these wonderfully FRESH Christmas Cactus... and they were all blooming... and I had to have one... so I bought it... I love it... it is so pretty and it is blooming all over the place now... wow so very pretty...

I used flowers from Pretties by Bonnie  and created the arrangement in the center... along with a few punched flowers, which I layered also for a little bit more depth...  The poinsettias, the grand lace edge and the ornament are all Spellbinders... along with the Label 10 in the background... I used a gold gel pen to create the diamond look on the ornament...  and pearls were added for the look I wanted.. as this tree... oh wow... it was loaded with pearl ornaments, ivory drops of pearl, etc... and I have captured the look here... I love it..


Here is a close up of the flowers so that you can see them a little bit clearer.  and the lines also...

Now I ask you... isn't that Christmas cactus lovely... how could you pass that one up???
I just might go buy and some more...  they will be lovely all around the house... and for a center piece... I will try and share another project later on this week... that I also made for the table...

Anyway... after I made this card I got a letter from a gal asking to show how this style card is made... and since I have been asked by quite a few people, I thought I would put that up as the same time...


Directions are below....


Start with a piece of paper 6 X 12 .... and then cut along the solid lines, and crease along the dotted lines... then decorate...

Simple and easy... ..


Please excuse the rough sketch, but this is all I wanted to do at the time... sorry about that... but I am in need of some sleep, but wanted to get this up so you could see it...

Hope you have a wonderful Week-end... enjoy it all... and thanks for stopping by... I love it when you do...

See you all soon... I promise... trying to get ready for a huge holiday get together... way too much fun...

Love, Light and Peace...Bonnie

Tuesday, December 7, 2010

More cards

I had a little bit of free time.... actually I was up in the middle of the night... and wanted to play, so these are what I made... of course I paid for it today... but that is okay, I did enjoy it...

Here is what I created...  I had jsut bought the Label 4 Grande and I decided to use the next to the largest... as I dont' have one of the new machines, so the largest one I can not use in my Cuttlebug...
Anyway I cut the label and folded it in half... to create a card.. I used the center of one of the Poinsettia die cuts... and added another smaller Label 4 for the background.  I used the Swiss dot Cuttlebug folder for that... Then I wanted to off set this, so I used a small section of the Bluee Hill punch on the side to create the paper lace...


A simple little bow and it was complete...

A close up of it...

I used gold around the edges... just to define the edges...


The poinsettias are naturally from Pretties by Bonnie and I used Tombow markers to color them...

I love these holly poinsettias... and these are layered...

I used a very soft green to sponge onto the frame in the background... I think it was bundled sage... by Ranger.


Have you ever painted a stamp with Twinkling H2's??? I love to do that... Generally you can get 10 plus prints from one painting...

Here are three that I really liked and turned them into cards...

After the paint dried, I restamped the original design again with Archival black...

This is many layers of white on white Cuttlebug folders .... and then the green layer behind the print is Twinkling H2O paper that I made...

Simple and I think elegant in looks...

This one I really love.. I again made this as simple as possible... I used the Poinsettia frame and left all white...

The print was left whole, and I stamped the sentiments on it...


When I made the cut card... I decided that I wanter the white to really stand out... so I didn't put anything on the side panels...

But I did add one of the Time Holtz deers..


Same print again, but this time I used a label 16 to cut it out... and then I used the Cuttlebug folder to make the background... and I added some paper lace by using a Martha Punch...

Down at the bottom I used a Spellbinders deer from the Holiday Fancifuls set... and a little tiny pearl for the nose...

Peace on Earth to all..

Well I want to thank you for stopping by for a visit... and hope that you come back soon again...

Love, Light and Peace...Bonnie

Saturday, December 4, 2010

Ornaments for Packages and the tree

I love this ornament die cut by Spellbinders.. The first time I saw it, I knew what I was goign to do with it... and I finally got them finished... I still have a few more started, but wanted to share with you so you could do some too... They are really fun. 

I started off by making all kinds of sizes and piling them up until I got the desired look... then of course I started to cut out the centers... Everything is front and back.. and the poinsettia center does turn... and what you see here is on the back also...

The gold cord runs right on down the entire ornament... and then there is a loop at the top to hang it on the tree... and also on the front of a package... 


This one I embossed the edges, and really prefer the gold pen to that... but wanted a different look...

The poinsettia and the cardinal are from Pretties by Bonnie  of course.... and the ornament is a dark hunter green...  The pointsettias are layered and I used Tombow markers on them...

Here is a close up of the same... 


The paper that I used for the red is bazzill and I love the texture for this... 


Now of course I had to have a card to match this... so ........


I really had fun with this one, as I love to layer as you know... and the more layers the happier I am... I had  this one sheet of this pine needle paper.. and had been saving it for a special card...

I used my Blue Hill punch... if you have problems with this, use a thinner cardstock, and then STAND UP when you punch... and put a hand on the back of the magnet area and then on the top to punch... works great...   I used some Twinkling H20's by painting them onto the stamp and then spritzing... love to do that...I actually got about 10 prints from this one painting...


The label is from the Cuttlebug Embossing plus folder labels... and I love them for certain looks... This one I wrote Merry Christmas on... and then put onto the card...

The cardinal and the poinsettia are from Pretties by Bonnie and I used my Tombow markers to color them...  The poinsettia is layered and also the center is done with Liquid pearls by Ranger. 


Okay... now do I ever stop at one???


I had to make and show you another one too..


I loved this because it is a little bit different in that I didn't  cut the center out...  I just started to layer all kinds of snowflakes... all by using this years and last years snowflakes by Spellbinders...

Then a few blue rhinestones... and a little silver pen around the edges...


Here are the close ups of this ornament...


The Top of the ornament up close...


I hope that you make a few...
I am going to put these on a few special packages... and know that they will really make the gift special.. 

Hopefully you will enjoy making a few of these... they are fun and how pretty on the front of a package...

Thanks for stopping by for a visit and hope that you are filled with the holiday spirit ... Enjoy the love that you put into everything at this time of the year...

Love, Light and Peace...Bonnie

Wednesday, December 1, 2010

New Embossing Folders...

Wow... I opened a box this yesterday to find the new Cuttlebug Embossing Plus folders... I only bought two of them for myself... but they are all great... I bought this one... which I love... it is called Deco Burst...
I did very little to this one, so that you could see the embossing folder easier...

There is really a wonderful center for this also... you will see that on the next card.. 

I am trying to use up odds and ends around the studio also... as my bins and bags are getting filled and I need to use some of these things...


This is one of the items that was in a bin... the center piece all punched and ready to use... and also the black cardstock card... so these went hand in hand, perfect!!!!

So you get to see the inside as well with this one... I usually dont' stamp anything in the center of my cards... I love to hand write a note or sentiment in there... so this is no exception...


This is the Deco Burst... and really a wonderfuly folder...


Here's the other one I made with the same folder... 


This one is has the center piece in it.. I used my Antique Linen distressing ink to show the design a little bit more.. 
The poinsettias on both cards are from Pretties by Bonnie
and they are two different sizes...

Both of these cards are 5 x 7 size... and even though they are lumpy, I hope they go thru on a single stamp... .


Now this one is called Whimsy ... and it also has a center by I have not used it here... in fact I made a lattice for the center.. a little spring like, but I am already wishing for Spring... LOL... truth...

So I used some pink... and then some pink poinsettias and a RED cardinal and then a piece of Grunge flourish which I used gold on it...

I do like this folder as well... so many things to use both of these folders for... my mind is spinning... just need a lot of time to produce all these cards and ideas...


Okay... so that was the Provo Delivery... but a few hours later... the Fed Ex man arrived with the Spellbinder order... yikes... I was bad there too...

I got one of the new GRAND Sets... Label 4.... and this is how I have used it for this first card...

I folded it in half.. and then stamped holly leaves all over the ivy green bassill paper... this card is 6x6 and so you can get an idea of the size of this... this is not the largest one.. as I dont' have anyway, other than a rolling pin to use it...

I used a holly wreath from Pretties by Bonnie and then a cardinal from Heartfelt... 

The back white punched circle was made by using the Blue Hill punch... this one has a bird theme... love them...

So that was my day... today we went and got our eyes examined ... yikes... that was costly... but well worth it...

Hope you have had a good day... enjoy your evening... and thanks for stopping by for a visit... some day I hope that I will be able to go around and visit all these fantastic blogs... being on dial up it takes a little to long to view one blog... over 30 minutes of download for me... so I spend my time creating and posting... the posting takes more time than the creating... LOL... not funny Bonnie...

Oh well.. thanks again... and have a fun creative time... Love, Light and Peace...Bonnie

Tuesday, November 30, 2010

Reindeer in flight!!!!

I am in the middle of trying to get everything ready for the Big Day... Christmas.... which is only 25 days away... yikes where has the time gone??? Does anyone see it flying by quicker than ever???  Well it sure did fly past here... Even though we are thinking about the spring plantings, and what to buy and what do we want, we are now also thinking about Christmas...

I am trying to make gift tags and special cards... so here is one that is a real combination... and it fills the challenge on The Shabby Tea Room Challenge... so it is perfect...

The Challenge was to make a card to GET IN SHAPE for the holidays... how great is that one... We could not use a square or rectangle... but could use an oval or circle... I choose to use the oblong oval from Spellbinders... I layered it with glittered strips of punched out paper lace with a new Martha punch... and then put an oval scalloped frame around it... then I made two Parchment Holly leaves and put a bow on...

Then I created the Reindeer with the Tim Holtz Die cut

And THEN.... I used a little Just Rite stamp to finish off the look I desired...

Wishing you a holiday filled with Peace and Joy... just my feelings 100%...


Here is a close up of the Reindeer and the greeting... The deer is so very delicate and I hope you can see all the glitter ... it is soft, but it layer upon layer of glittered paper lace...
On the back I put a Swiss dotted oval just to finish it off... and then also a space to write a message...
This is an card first... as it will be mailed... but it is going to go onto a present as well.. and then it can be used as an ornament... I love it when a plan comes together ...
Thanks Debbie for such a great challenge this week...

How you all have a wonderful week of creating and getting ready for Christmas... and also thanks for taking the time to stop by for a visit... Love, Light and Peace...Bonnie

Thursday, November 25, 2010

Chistmas is holly and.....

Christmas is holly, and reds and greens.... and the smell of balsam in the air... All favorites for this time of the year... I love them all. I had always wanted to have a bouquet of holly when I lived up north... but it seemed so very expensive for a few branches... now I have huge trees all around me... We have one that is over 45 feet tall... and it is so wonderful... I love them all... but I leave them to grow... and do not disturb them during the holiday season...I just admire them... all year long...

With that said, you can understand why I have to make so many white cards with Red and Green, and with poinsettias, and with holly and with all the Christmas things... I love them... So here are a few more that are from the Poinsettia with Background collection on Pretties by Bonnie  I have really had a lot of fun with this collection... I hope that all of you have bought it are also enjoying it as I am...


For larger views of these cards, please go over to Pretties by Bonnie
I have a lot of cards to share with you...

This one I used the newest Cuttlebug Embossing Plus folder... called Carly... it is really so pretty... you will see a few more cards made with it... I had fun with this one... I also have a few extra right now... so if you want one, let me know...


the cardstock that I used on these cards is a very deep rich hunter green...it shows up black... but it is a lovely deep green... 


This card has a new embossing folder from Winter Frolic... there are some cute folders in that set... but this one was perfect for this... Wishing You Peace and Love at Christmas and Always... how perfect is that for me... I love it... With a border of holly and berries all around it... take a larger look over at Pretties by Bonnie


Now this is just the Carly embossing plus folder by Cuttlebug... I used the stencil part also... and then used a thin black marker to go around all the embossed areas...

And the center was sunken into the oval center... so soft and pretty...

I wanted to show you the beauty of this folder all alone...


With this one I added some things.... The border is a Fiskars punch... I love it... it is new to me and so sweet... don't know why I didn't have it a long time ago... I love the sweet little daisies...

Even though this is not a demur embossing folder, it certainly does allow this saying to go with it...


Here is the corner of this card... all the delicate parts... the edging, the sentiment and  then the embossing... I really love this look... ..


So much of the country is covered with snow and ice... so I had to make this card for Joanne Travis... who motivated me to make this... as she was going out to make a snowman... Oh I use to love to make snowmen with my kids... so much fun..

There's no people like snow people.... How very true... sometimes they are around for a long long time... just slowly lingering to catch as much of this life style as possible.... LOL  !!!

I used a Cuttlebug folder from Winter Frolic set for this... and used a marker to color all the embossing and then a little stickels to add the glittery snow effects...

The background... a New Martha punch set... wow... what a pretty one... The snowman is an Inkakadinkadoo stamp... look closely and you will see SANTA.... and his reindeer... and also little trees and all kinds of fun things... so cute...

Well Take a look at the top cards over on Pretties by Bonnie... and have a happy day creating all that you desire... Thanks for stopping in for a visit and please come back again... Love, Light and Peace...Bonnie

Wednesday, November 24, 2010

More cards ! ! !

Today I have a few cards to share with you.... the first one is to my Grandson, for his Advent house... it tells him what to do... also that the ELF is watching that he only opens one drawer a day.... LOL... so much fun.

I sure do wish I had an ELF around when our kids were growing up... although they were really not a problem with things like that... at least I didn't know about it... what we don't doesn't hurt right???  This little elf will help.

I made him with a digital that I got somewhere... and I love it... he is so cute... and then I used a Christmas ornament embossing folder to create the side panel.. I used markers and Stickles to decorate it ... love that stickels... works like a charm to spruce things up a little bit...

Just Rite is having the last challenge of the year.. so I made a few cards for that too..
This one I was reminded of by a card swaping friend... Cathy Kaylor... who sent it to me... we had made this card a while back in the spring and I had forgotten all about the fold... I love it... Thanks for the reminder Cathy...

Anyway I used embossing folders behind all the white... and then stamped all the cute little emblems for the corners and then for the main section... Everything is pop dottted so it is really sharp looking...
The Bow is detailed with Flower soft... as are the holly leaves on the corners.  

Here is one of the corners so you can see the detail there too...

I used markers to color and a gold marker for the edging...


The little red bows really make it pop...


Another card ...  A cute little snowman...
I had just bought this punch set the other night... thanks to Marie... Thank you Marie...
I love it... and it is so perfect for so many different themes... for this one it really reminds me of snow flakes... so I used the Snow man on the sled... with some added snowflakes and little blue star rhinestone gems... how perfect... love it ...

I used Flower soft for the fluffy white snow... and accented the flower soft with some dew drops...

Just so you can see up a little bit closer... this snowman is really presious... love him...
I know some one who will love this as a Christmas card...

Hope you all have a wonderful Thanksgiving... and if traveling a safe and sound journey...

Thanks for stopping by today.. and taking a peek at my corner of the world...
Love, Light and Peace...Bonnie

Friday, November 19, 2010

So much to share with you...

I have so many things to share with you today..
First off... I have posted a few things on other blogs... as I just didn't think I should put it all on here... LOL... way too much...

I decided about a month ago to start to create an Advent house for our Grandson... so I have published that on Art Between the Pages...  But here is a small picture of the finished house... there are lots more on the blog...
I really had fun creating this and hope that you will enjoy it too.. so please stop by and see all the fun things I did to create it...


Then I also did another release today on Pretties by Bonnie

I had so very much fun with these digital images.. and I hope that you will too... they are precolored.. so all you have to do is to print and you are ready to make a card...

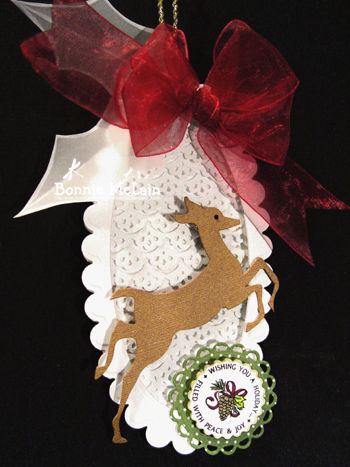
Here is an example of one card I made in minutes...

I love this one... and it was so very simple and quite striking to say the least...


I do hope you will take a look see..


Okay... but that is only a few of the things I have been working on...
I still have something else to share with you...


 Last night was our monthly stamp group meeting.. we always have a fun and good time... lots of laughs, enjoyment... and also I have to say buying and paying each other ... LOL... those there last night will certainly remember all of that going on.. I always bring a box of goodies that are extras etc... and the gals have fun buying a few things that they didn't know that they HAD to have.. Oh my goodness... last night I even got Marie to sell a really pretty punch set to me... you all know how much I love these sets... well as soon as I got home I had to punch out some pieces... I will share with you soon... dont' worry..

Anyway... today I wanted to share this really fun card that Marie patiently shared with us...

The front of the card looks like any other card... but when you pull the ribbon... it slides open... so much fun... 


I used the Poinsettia Background for the front panel.. and then added a cardinal from Heartfelt Creations... and a holly poinsettia from  Poinsettia Background collection... 

I stamped all over the dark green paper with a lovely pine cone and pine branch stamp... and used versa mark to create the images...


When you slide it open... You can see two messages..
(I didn't take the picture so that you could see the second message.. but it is there...  ) 


 This is what it looks like when open... so much fun... I love it when surprises are at hand when you open a card ...

Deck the Halls with boughs of Holly.. I just might do that this year... but it is so hard to clean up... but so very pretty with a few red bows... plain a simple ... with candles and holly... lovely Christmas time...

Thanks again Marie... We also made a cute Gingerbread boy and girl card.. and a turkey... with chocolate...
I will share them later on with you...

Have you ever started to think about creating a special card... and then you go to create it... and it doesn't happen the way you want it... well that is what started 10 days ago with this one... I wanted to have it one way, and tried to do it... but did't like it and so I did something else... then I tried it the next day... and something else came out... so finally yesterday I was able to get this card done the way I really wanted it... after many tries... I FINALLY got the elegant card I wanted...


The front of the Window Poinsettia card...
I used the Holly poinsettia from the Poinsettia Background collection... and made it large... so that it would fit inside the window of this Spellbinder Frame...

I colored the poinsettia with my Tombow markers... and also some Liquid Pearls in the center... love the textures of that...

I actually used 4 poinsettias to make the flower... two on each side and I flip them when printing... one of the great things about digital images... you can create the look and do what you need to do with the images...
 After coloring the images, I glued them all together, and then a thin gold thread to hold them from the card and frame..

Swiss dotted paper was also used for additional textures... love them all..

Then when you open the card...

 
The filigree is from a die cut made by Spellbinders for Heartfelt Creations... love it.... so very elegant in all it's glory...

Using one on the front of the card.. and two on the inside... Also a Background from the Poinsettia background collection... as is the Holly poinsettia and the cardinal...

Looking a little bit closer... you can see more of the details...


I love the richenss of the Christmas colors.. and the white really makes it stand out even more...

I do hope that you will take a look at the other two blogs... and see all the goodies there... and also that you have a fun day creating your special items to share and give...

I have certainly had a lot of fun with these digital images.. and do hope that you will too.. Thanks for stopping by... and see you soon... Love, Light and Peace...Bonnie