Followers

Showing posts with label Faeries of the flowers. Show all posts

Tuesday, July 1, 2014

White on White with the MOTHER

Who is the MOTHER??  Well Mother Earth of course... 

This week on Simon Monday challenge blog the challenge is to use WHITE...  You can use it in any way the you choose... but I love white on white... some of my favorite cards are white on white...  love the confectionery type of card...  with lots of laces and multi layers of it all... and then all of a sudden on the last section of the card... colored FLOWERS... love it... 

Anyway... if you are interested there should be a few on my blog someplace... as I sure sell a lot of the kits to make these... 

But back to this piece that I just finished... I wanted Mother Earth's spirit to be as real as possible... so I gathered up all kinds of things and played... now mind you... I only have a few hours... as our green beans are popping... and 30 quarts are waiting to be canned  NOW...  we do love them in the winter... so it is a pleasure to do them in the summer months...  they are so very delicious too... 

Okay.. I know you want to see the picture... enough already with all the words...

 
Embrace the MOTHER
is in chit chat at the bottom of the frame... all the details as we go along here...  but that is the official name of this piece... 
 
I took many pictures of the face and draping... different ways so you could see as much as possible... 


She really is smiling, and has a very sweet face... just as the Mother does...  a very serene one...  but you will see many views and they all sort of look different... 
 
I started off with a face that I had made at least 5 years ago... using air drying clay and a mold I made at least 10 of them... I found them the other day when sorting thru stuff...  and thought I should use one of these...???  so I did...
 
I glued it down onto a piece of card stock and started to drape tissue paper around the face... this is what happened... of course I had a jar of Gesso handy.. and that is how it all got to be so wonderful around the face... I love it...  and I know I will use this technique again and again... (hey I have at least 9 more faces...  )  When I pulled them out of the mold each one was really different too... so I picked out the one I loved the best... 


a little bit more black in the picture... just to show you the depth of her face and drapping... 

 
she really is smiling at you... saying how much she LOVES YOU... 


A lot darker, but you can again see the depth and also all the imperfections...  but I still love her... and she almost looks like she has painted eyes... which she doesn't... she is ALL WHITE... 

 
You know these kinds of frames... from the $1.00 stores... well this one I think I again have about 3 of them...  ????  for what... ART and playing with... love them... so I gesso it a long time ago too... and never used it... but today.. .I put some of TIM's Tissue on it... OM Goodness... I love it...  really fun too..  I don't want to hide it though... 

 
Well she just fits in there so perfectly... and I added some of these fun little flowers that I made... you know the kind... the ones that you use to buy in the dime store in the late 40's...  oh my... that long ago???  anyway... I made a few hundred of them the other day... and some were white... with white stamen...  You can see a cute story about these on the post I did on the  29th of June...  I love these little flowers as much as I do all the big ones I make... 

 
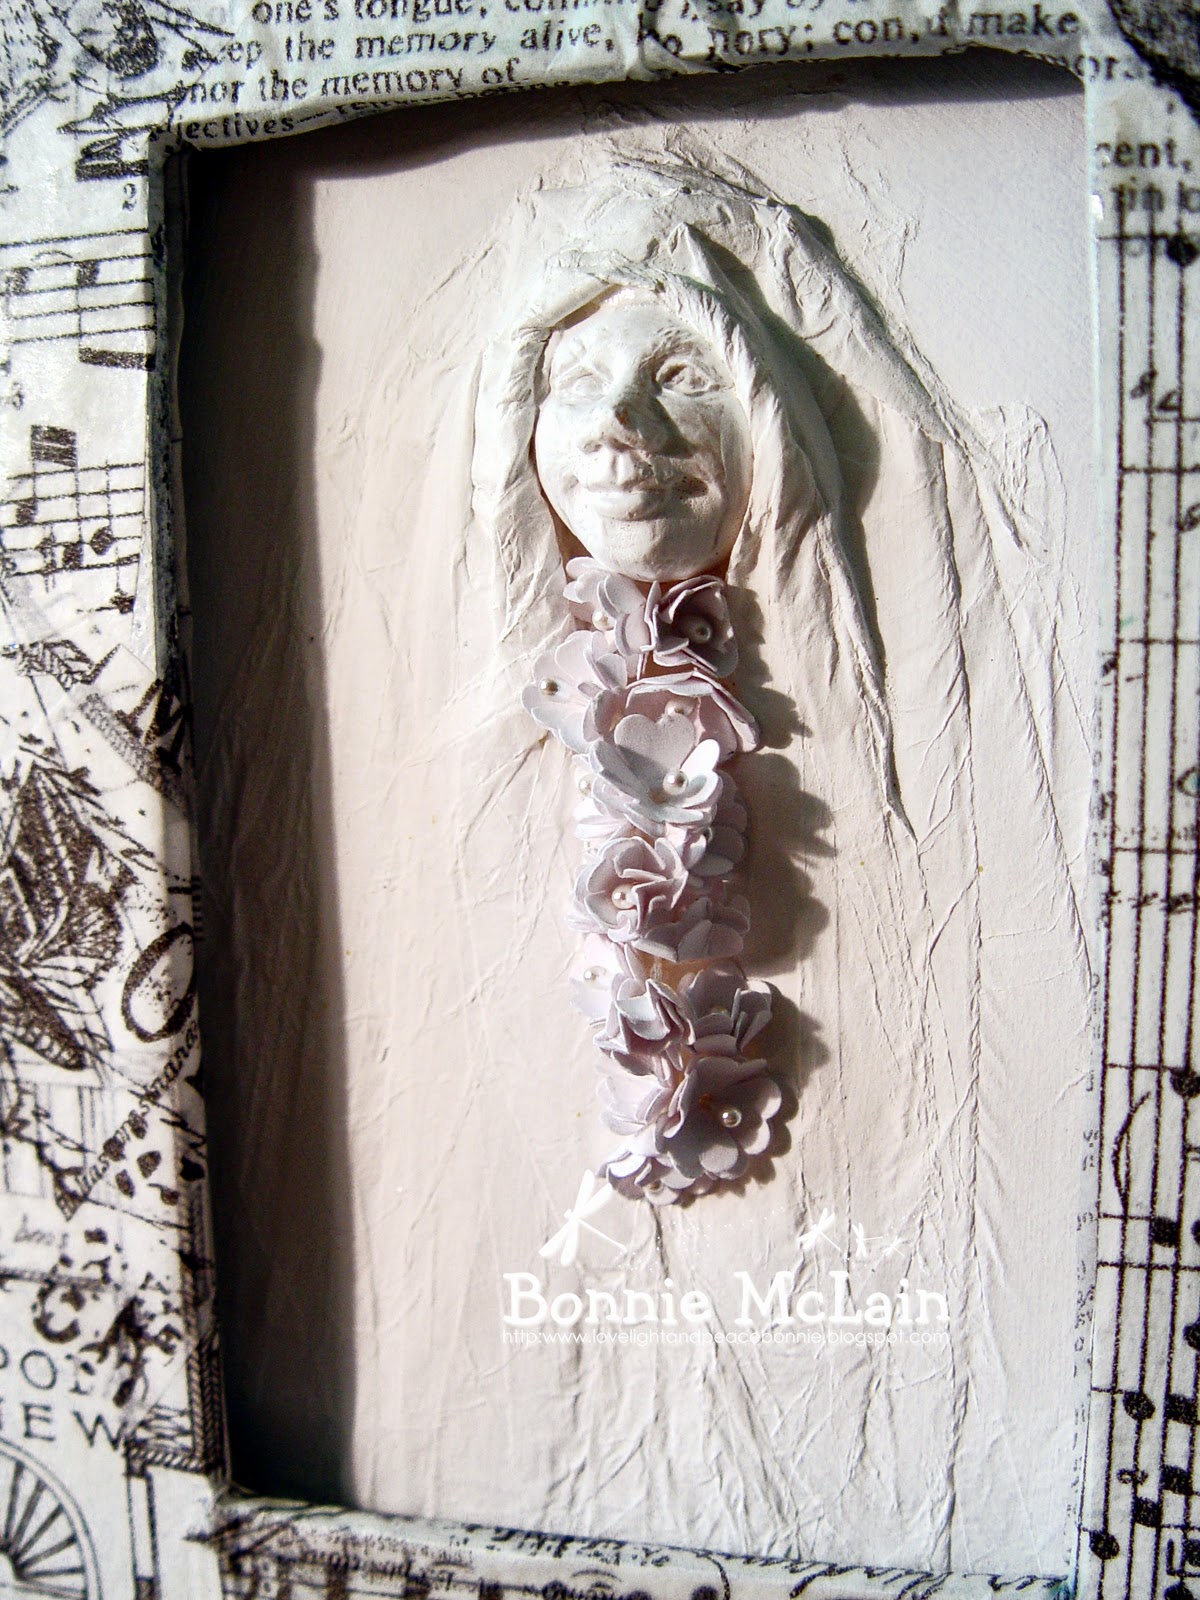
Here is a side view... well sort of ... and the flowers look like a lace blouse...  I love her...  she is really so pretty... 


Just another view... 

 
have you ever crackled a glass bottle... well I did... the directions are in the Compendium of Curiosities book three by Tim Holtz... I love this...  and I gathered up some Fairy dust and put it into the bottle...  it is all white...  with the exception of the cork top...  didn't want to color that...

 
Again ... so you can see the completed picture... 

 
I used my Tim Holtz butterfly die and cute three butterflies from clearly art plastic sheets by Wendy Vecchi , and covered it with Tim's frosted film... and then used some white alcohol ink to add some 'color' to it... there are three butterflies, one on top of the other to show flight and freedom... 

 
Using the best flower die on the market... Tim's Tattered Floral die, I cut some Muslin and also some tissue flowers... and added some stamen to the tissue ones... the muslin flower and leaves are really fun to play with... will get more into these for a quilt square really soon...  I have to get my quilt done this year... it is to cover up my French doors in my studio... and the squares are 22 inches square and each one is painted and created differently with all kinds of color themes...  love it... totally FREE in all ways...  nothing set in stone... 

 
I added this really pretty white glass disc... it looks like a large marble has been flattened... ??? dont' know what it is... or where it came from... but a dragonfly has decided to rest on it now...  along with a few of these flowers in a Antique Linen...  they are all around the place...  look.. you might see them... 


Since I had fairy dust... I needed to have a fairy... so I cut the flower fairy out that is called white clover... this series of fairies is one of my very favorites.. LOVE THEM ALL... 


Mother Earth Energy... 
You can see the flowers a little bit easier here... each one has two flowers and a stamen... simple and cute... do you remember them... they came in a little bunch and each flower was a different color.. .I loved them... 

Embrace the Mother...
Be kind...
love her in all ways... 
 
Hope you have enjoyed this and thanks so very much for stopping by for a visit...  Please don't forget to go to the Simon Monday blog and check out all the other work there... there are some really magnificent pieces there...  really dynamic... 
 
Thanks again... have a great evening and day...
Love, Light and Peace...Bonnie 


so here she is in all her glory... 

Thursday, April 24, 2014

TRI FOLDED CARD

Oh I know you have heard me say this before... but this happens to be one of my very favorite card styles using medallions... it is so very flowing and everyone who sees them falls in love with them...  I have not heard one person say anything other than flowery words when they see these... I have made many... and maybe you have seen others... (only in person... I don't think I have put any others on line...)  ?? 

I call it a Tri fold... as the paper is folded to create a tri folded card...

I use a piece of 12 X 6 paper... and fold so that there are three equal sections... You also need about that much space to play... love it... a larger piece of paper just would mean it would take me longer... love making these pretty cards...  With paper this size it gives you a section of 4 x 6 to play in... 

Yes there is planning on where to make the peek a boo circles... and what medallion folds to use in each section...  You can use solid paper... or double sided paper... but you do want a sturdy paper... I have also used regular card stock... and then glued on other pieces of paper in each section for the strength... 

Okay.. I will tell you more as I go along.. Maybe..??? 


Front of the card..  the background is two layers..  one with the Martha Stewart punching... and then a dry embossed layer over that....  the medallion is created for the circle that is cut out...  the clip art is from a gift card... 
 
When you open the card.. you will see below... 


This is just the card open one time...  as you can see the circle on the front is up on the top of this side... and another medallion is on this side... with of course a faerie of the flowers...  when this is closed... the medallion in the lower panel can be seen thru the front panel...  (sometimes the cards will not cooperate when I am taking the pictures... LOL) 
But I think you can see that the medallion under is peeking thru in the lower panel...  that is what the purpose of this card is... the medallions are all peeking thru from layer to layer...  such fun... 

 
When the card is open entirely this is the view you see...  three panels...and each one has viewing a couple of times... such fun and mystery...  is this card not fun... it is even more fun to make this card...  I love all the sections.. and have basically done the same with each panel... he MS punching around the borders of an embossed piece of paper... and then the medallion... simple ... well you know what I mean... elegant and allowing the medallions to POP out at you... 
 
 
Hope you have enjoyed this one...
and thanks so very much for the visit to my blog... 
Love, Light and Peace...Bonnie 


Friday, April 18, 2014

Happy SPRING

 
Happy SPRING... has it really arrived yet?? not here... thought it did... but then it turned cold.. really freezing cold here... hopefully it will start to warm up... and not turn in the blazing HOT SUMMER weather... are we ever satisfied.???? 
 
anyway... 
 
I wanted to share this fun card with you.. it is all about SPRING... 
Opening the windows of your home, to air it out from the long winter months...  and seeing all the pretty flowers blooming outside... 
 
Of course all the butterflies are flying, and the gardens are all cleaned up and ready to grow all the things we need around us from flowers to veggies. 


A closeup of the window... I love love love this adorable little window... it is a spellbinder die and even though it is hard to get a nice clean cut with this particular die... I dont' mind...  as I Love the final outcome of the way it looks on any project. 
 
This rabbit is also so very spring like with the pussy willows...  love him too... 


These step cards really put your mind to a test of what to create and where to put it all... so I have faeries all around the card...  as you can see there is one in the center step... and a medallion behind her. 


Over on the right hand side of this step card, I have another faerie looking at a clover flower and also another medallion..  along with more flowers which I made from white tissue paper and used the tattered floral die from Tim Holtz...  so very fluffy and pretty and spring like. 
 
So there you have this card... 


A close up of the medallion...  this is a new one that my friend Penny sent to me... love it ... thanks again Penny... 

Hope you have a wonderful holiday week-end...  no matter what holiday you are celebrating...  just enjoy the SPRING weather and the renewal of life. 

Thanks for stopping by for a look see...  and a visit... love having you stop by. 

Love, Light and Peace..Bonnie 


Thursday, April 17, 2014

Another special gate card with a panel

Sometimes a card is more than special to you... it might not be the way it looks as much as what you felt while you were making it... a really good feeling and lots of love and peace...

With out saying too much more...


Okay... do you see the circle cut in the center of the medallion... when the card is closed you see the word love... that is stamped in the center of the card... you will see it below.. 
 
A vintage girl.. and a medallion...  okay.. the underneath section is a Just Right stamp... and the leaves are a stamp I made...  love my leaves... 


When you open the card... this is the inside section of the left panel...  the medallion is on the back side of the front circle... 

 
This is the card open entirely... 

 
The center section... 

 
The right panel... 
 
So there is that special card... I personally totally enjoyed making it...  and love all the punching, faeries, and LOVE...  just a fun filled card... 
 
 
Thanks so very much for stopping by for a visit... have a great day... enjoy it every second of the whole day... enjoy being ALIVE... live it to the fullest... 
 
Love, Light and Peace.... Bonnie 
 

Wednesday, April 16, 2014

Blue forget me nots...

I love this particular clip art and wanted to make a special card using it...  I wanted the clip art to wrap around the tea bag folded medallion...  so here it is...

 
I love this one... I used a blue ink around the edges of the punched area.. and then a little green...  vintage looking a little bit at least...  and then went to town having fun.. 


the clip art going over the medallion 


the inside of the card... when you open the first flap... 
 
The little faeries of the flowers are so very special to me... love them... 
 
Just right stamps are layered in this one too... 


when you open the last flap... you see this... a special pocket to put a gift into and or a special message...  I used just a punched piece of paper, leaving space for writing... 
 
Love this card and it will go out to someone  very special ... no matter who it goes to, I hope they enjoy it...
 
Please don't forget, I do sell 99% of my cards... so if you are interested in any, please let me know and I will tell you the pricing and also get them out to you as quickly as possible...  next day is always an option...
 
Have a wonderfully creative day in all ways...
Thanks for stopping by for a visit... and see you tomorrow...
 
Love, Light and Peace...Bonnie

Tuesday, April 8, 2014

A card of love to a DEAR FRIEND

When you have a friend... does it mean you have to know them face to face...???? Or can they be a friend whom you have met thru the internet and shared life time experiences with???  Well Penny Wessenauer is one of these friends in my life... she is always so very willing to share and give to all...  a true person in so many ways... and I have never met her or her lovely husband Don... but both are so very wonderful people.   I wrote to Penny about a card I had seen on Facebook... this was prior to me getting High speed internet service... and I loved it... Penny sent me a card, because I was unable to sign into Yahoo and join a swap...  so I sent her one back...  this is the card I sent to Penny... my dear FRIEND...  thanks again PENNY for being YOU... 

 
This is the front of the card that I sent to Penny...  as you can see it is a gate card with a panel on the left side of it...  and I put a medallion on the center circle...  yes... there is more on the inside... this card is for PENNY...  do you think it would be bare??? 


Here is a close up of the medallion...  

 
When you start to open the card.. you will see on the left panel another medallion inside a specially folded square...  such fun... with a little bird in a nest...  the violets are in the center of the card... 

Here is a close up of the medallion... 


In the center of the card thee is a vintage clip art... and a zen tangled snail... and of course a little daddy bird..  looking for snacks for the mommy bird...  Over on the right you will see the right hand panel... with the little Faerie of the flowers...  so sweet... 
 
I know that Penny loved this card... and hope you do too...  Hope that Penny will send me the link to the tea bag folding group.. so I can rejoin the group...  would love to join... and do some swaps... can't find it on yahoo...  ??? 
 
Well hope you enjoyed this card.. and have a wonderfully happy day... thanks also for stopping by for a visit and hope to see you tomorrow... 
 
Love, Light and Peace...Bonnie 


Monday, April 7, 2014

Gate Cards

I love making gate cards... they add a different dimension before you even get started with the rest of the card...  never made one???  better try making at least one...  they are fun. 

Tomorrow I will show you a different style gate card... so please make sure you come back tomorrow too... LOL... getta get you hooked on visiting here every day...  I love your visits... thanks always for stopping by... 

Okay.. here are some gate cards... 

 
Okay... so these are a little bit different than the average gate folded card... but hey... I am different anyway... right???  I cut a circle in the middle of the gate fold, to put a medallion there... what fun... love it... 
 
Also a challenge at this time in my life... doing something a little bit different keeps me on my toes all the time... 
 
A gate folded card is simply folded differently...  take a piece of paper... lets say 12 x 6... and with your score board score at 3 and 9 inches...  or make a score mark in that area using a ruler...  fold into the center... a gate card has now been created by YOU...  EASY... 

The center of the card then needs to be decorated.. have fun... here I used a piece of tea bag tile paper, created with using a half inch tile... really makes a nice background paper... you can create this with any of my tea bag tile kits... using the tile making program...  check it out on the medallion art blog... (to find that... scroll down on the right hand side of this blog and you will see the medallion art tag... click on it... another whole world of stuff) 


A Valentine card for my special Valentine... 


Inside medallion 
 
 
Did you enjoy this... are you going to make a gate card... hope you will... even if you have made tons of them... make another one... and try and make a circle that will let you see thru to something else... what fun for the person that receives this card...
 
Love life to the fullest...
Thanks for stopping by for a visit...
Love, Light and Peace...Bonnie