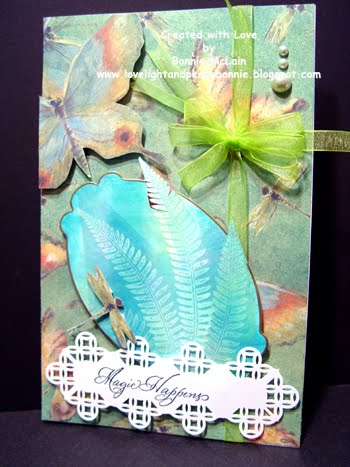
Oh sometimes we have to look a little bit deeper to really know what is going on in ones mind... Especially when someone is in deep thought... like a meditation... especially with a butterfly... How precious is this one.. Love it...
Okay.. this card is only for a couple of challenges...
One is for Cute Care Thursday.. where you have to use a butterfly ...
Oh Alice wanted Mythical creatures... which this one is, with the purple hair... although I guess today... it is not mythical at all... but to me it is...
and
Then how about the sketch Challenge at Mojo MOnday.... Love it... that is what I used to create this card with...
I used the butterfly vs. the ribbon... as this card needed to be a little bit on the light weight side... even thought it is a huge card of 5.5X8.5... it will go nice and light...
The background on this card... I used a resist technique with twinklng H20's... and then some inks to accent where needed...
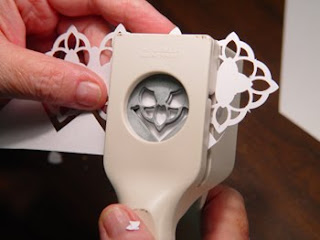
The punching... oh some of that fun punching... look under tutorials... on my blog here ... and you will find out how to create it... love doing them..
This card is also going into the Sweet Pea Challenge too..
So another card... another day.. .and more blogging... now for dinner, a little relaxation... a few friends to talk to... and then bed... which has been calling to me all day long...
Hope your day has been a good one... Love, Light and Peace...Bonnie
Followers
Showing posts with label Tutroial; Martha Stewart Punches. Show all posts
Tuesday, September 21, 2010
Tuesday, August 17, 2010
Happy Tuesday!!! Two Challenges !!!
I love to do challenges... and have not had the time for the past few months... way too much on my plate... as they say... But today I made the time... and I guess that is what I am going to have to do... as I loved making each and every card...This top one!!!! Okay... many facets..
It is from my CD All Seasons... the picture and the ta bag tiles are both on the CD... along with 100's more pictures and 1000's of tiles...
I copied the picture the right size I wanted, and cut it out... and then I made the two medallions.. one for the front of the card... and the other one for the inside..
I also followed the Sketch design from Midnight Madness...
and so I needed to have an oval and two pieces on the front... so as you can see, I have added them... and added a little of Martha Stewart punching along the center and the edge of the card..
Three ribbons for the Sketch design.. and I was happy...
Now the other Challenge this is for is the Color Challenge... Betty picked the most wonderful colors today... Cherry, Pink and Artichoke... I might have these names wrong... but you get the idea... as they are on my card... I used the colors on the entire card... but also for the ribbons... I loved using these colors... MY COLORS BETTY!!!! Thanks ...
I didn't add the use of pinking shears... as I really forgot until I just saw it... oooops...
Oh well the colors are delicious.. and I love the card..
So that is two Challenges...
The third challenge is for Tea Pot Tuesday... and the challenge was for a little boy named Dante...
He is in the hospital... and just had a bone marrow transplant.. he received it from his little sister... he is only 8... so I don't know how young she is... but I made them cards...
That was the challenge today... a card for Dante... who likes to FISH!!!

My Fish... it was made naturally with a Fred Mullet Stamp... and I used a lot of different embossing powders to get his main colors... then I used Twinkling H20's to paint him... all the way that Fred teaches with these wonderful fish stamps... I love these... and think I have most of them... they are wonderful gifts for men...!!!!
Anyway.. .I get so carried away..
I then scanned him... and shrunk the fish so that he could fit onto the card...
Created some ovals with Spellbinders... and mounted with the same.. Label 10.
The background... oh fun again... Paper painted with H20's... and then thru the Cuttlebug with D'vine Swirl Folder... accented it with a gold pen..
Then I used one of the tiles from him also... and created the medallion... which has 80 folds to it.. and with each of the folds... I said a prayer of healing for this little one... Dante... and his family.. that they all heal... and can learn from this to live a happy and healthy life together..
Put all together and it is a lovely card for Dante!!!!
I would love to share his address with you also... so that you can send a card too.. the more the merrier for this little one... You all have so many... and sending him one, would make him so very happy... Thanks ...
His address:
Dante Erk
c/o Tara Dalton
520 Brushy Mount Road
Gretna, Virginia 24557

I made this little one for his sister Julia... who also gave him the bone marrow... how sweet of her... another medallion with 80 folds and hugs and happiness to her..
About two weeks ago or so... how time does fly??? I joined in on the annual fun time of SplitCoast Stampers... and as a member was given 33 challenges... you could combine them ... and I did with some of them.. but did manage to make 26 or so cards for the 33 challenges... and I was crowned a QUEEN...
My prizes arrived yesterday.. and here they are..
A Lovely card , hand made... but Understand BLUE... I thank you so very much...
also .. a stamp from Taylored Expressions and also from SCS... and a roll of tape... great useful gifts... thanks again.. I will certainly use them all..
So that is my day so far...
Have a few things to do for the house/farm... like can a little... we still have a lot of produce coming it... okra, cantelope which is delicious... and also blueberries... ymmmmm mixed... wow off the charts... and then more zucchini, beans and cukes... so gotta get busy..
Talk later...
Hope you all have a wonderful day...
Thanks for taking time to stop by my blog...
Love, Light and Peace...Bonnie
My prizes arrived yesterday.. and here they are..
A Lovely card , hand made... but Understand BLUE... I thank you so very much...
also .. a stamp from Taylored Expressions and also from SCS... and a roll of tape... great useful gifts... thanks again.. I will certainly use them all..
So that is my day so far...
Have a few things to do for the house/farm... like can a little... we still have a lot of produce coming it... okra, cantelope which is delicious... and also blueberries... ymmmmm mixed... wow off the charts... and then more zucchini, beans and cukes... so gotta get busy..
Talk later...
Hope you all have a wonderful day...
Thanks for taking time to stop by my blog...
Love, Light and Peace...Bonnie
Sunday, August 8, 2010
Ready??? Get set... PUNCH!!!

Today I am going to for fill another promise... I am going to show you another way to use the corner punch... if you didn't do the first tutorial on corner punching I would suggest that you try that one first... but you be the judge on that... just hope you can understand this..
I had quite a few gals leave comments and also write to me that they loved it... so I hope that this one will do the same..
Please let me know...
Thanks...
My e-mail address is bongem@earthlink.net
so you can drop me a line there too. Thanks..
Okay.. .I made a few cards using the punched strips... so that you can see how I use them...
So I am not going to go into details about the cards.. just enjoy them... but look at the punching... that is what we are going to focus on NOW!!!


Okay... you will need
3"x8" strip of paper...
A corner punch
A pair of scissor...
( long is better.. you need to cut straight across ... and the length helps.. )
3. Now with your scissor... cut across in the direction of the punch...
These words might not be the right ones... but look at this picture and put your scissors in the 'slit' that the punch made... and cut across...
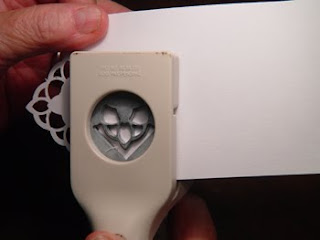
6. Now punch lining up the edge of the paper... as we did in the other medallion...
NOTE: Each punch is so very different.. due to the design etc... so you have to make adjustments with each one... With this one... you have go into the punched area to make the three punches...
8. Now do the other side... lining up again the same as much as possible as you did the other side... That is really the trick to this whole thing... what you do one side.. .you have to do as exactly as possible on the other side..
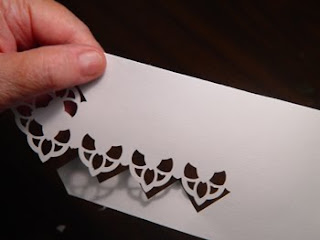
9. I did have to overlap with this punch.. but with most you don't have to... just play it by ear... this is after all only a 3X8 piece of paper... not the end of the world... start over if you make a mistake... Trim off the mistake and start again... as you can make this 'strip' any length you desire... if you notice in the cards above... some of mine are only a couple of punches... while others are longer...
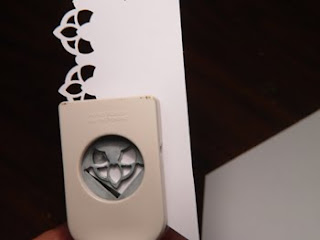
11. Now we are going to go the length desired.. you have to line up the punch with the previously punched area... if you look very closely at this picture, you will see the tiny little black area over in the far lower section of the punch....that is from the last punch.. line it up... and punch going down the length of the strip..
14. When you have come to the end of desired length... again CUT THE PAPER in the direction of the slit...
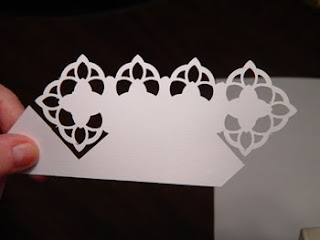
16. Now you are going to again line up the edge of the paper... and also using good judgment punch the end punch... If you will notice... my paper didn't quite line up... but I had more than enough room to straighten out the punch.. .
20... Final punch... all lined up and making sure that I am good on both sides now.. .
as this will make it look even..

21... Finished!!!!
One thing to remember...
Practice makes perfect...
Keep on trying..
and then try again..

I have done a few with other punches... just so you can see them... sometimes when you follow the punching it makes it easier..


I hope that you have enjoyed this tutorial...
I love these on cards, bookmarks, scrapbook pages, gift tags... all kinds of projects... so cute and versatile in so many ways....
Have a wonderful day...
Don't forget to visit my store...
TOYZ 4 PAPER
More coming on all the time... so check often..
I live... I create.... I am...
Love, Light and Peace....Bonnie
Labels:
Tutroial; Martha Stewart Punches
Subscribe to:
Posts (Atom)