This was a really fun tag to create... I love making intricate backgrounds for the Vintage Clip art...
I started off with some ink on my worksheet... and then used a distress ink pad (vintage photo) on a 6x6 Impression Obsession stamp... love these things... can hardly wait to get my hands on some new ones...
Then also took the script 6x6 and stamped in the corner... the rest of the tag was all fun too... I took some silver tape (refer to Jan 23 post) and a heart spellbinder and created the frame for this sweet vintage picture... added a little seam binding with some iced spruce ink pad... and then added the shoe...
The dimension on this picture is really great... had to use this one...
Hope you find this a fun technique to do... simple and effective.
Have a great day, and thanks for stopping by to see my Valentine tag... come back tomorrow for another one!!! Love, Light and Peace...Bonnie
Oh what a fun 'holiday' we have coming up.. VALENTINES DAY!!! I love it... the best holiday of the year for me... (actually they all are... I love each and every one of them.. )
Anyway... This week on Simon Says Stamp and Show... they have asked to show a King and Queen... so here is mine...
The King and Queen of Valentines Day... a vintage print from Kaiser Paper... and I used a Spellbinder heart die on the background... and then a little butterfly... Of course I used all my Distress inks on the back ground... and then ran thru a cuttlebug embossing folder... and rubbed distress inks over the embossing... what fun...
Thanks for taking a look see... hope you will check back in each day to see more Valentine Tags.. I am putting up one a day until February 14th... Happy Valentines Day to you...
Love, Light and Peace...Bonnie
The back ground of this tag was so very easy... I smeared white craft glue all over a tag... then used some of Tim Holtz's tissue and crinkled up a width of the paper.. and put it onto the tag... let it dry a little and then used a Distress ink pad and rubbed it over the edges and where I wanted some color... easy peasy!!!!
Then I made some little flowers using Tattered Floral die cut from Tim too... and used some baby wipes for the paper that I used to make the flowers... love these soft little flowers... and the paper is never ever like any other paper... really wild.
Looking from the top of the tag to the bottom, you can see that I snugged each flower into a crevice of the tissue paper... love that effect... dont' you???
The richness of the color of the flowers is so like Valentines day roses too... don't know what I cleaned up... but I would guess it was Raisin Color wash!!! What do you think???
Okay... a little vintage clip art... a Valentine clown... love her...
The heart is an old stamp??? Can't remember what company it is from... as I took all the wood off all my stamps about 5-6 years ago... as I needed room, so I could buy more!!! I used some Clear Rock Candy Distress stickles...on the flowers and colored the stamp with some markers...
The forever came from Tim's newest Valentine stamp... and then made the banner for it... a pretty flower tag...
See you tomorrow... and thanks for coming by to see what I created... another fun one tomorrow... see you then... Love, Light and Peace...Bonnie...
Layer upon Layer of petty coats, and also paper on this tag... I used a technique using a spritzer bottle of water and also some mini misters to create the back ground... and then did the same on another piece of paper that I ran thru an embossing folder... (flowers) and then used another piece of paper that I had colored with Twinkling H20's for the heart Punch...
You can see the twinkling of the paints here... really fun to use... and the effects are truly a lot better in real life!!! the whole tag glimmers... as I gave the whole background a spritz also with some Perfect Pearls mists... love them...
Another tag for my son...
Thanks for visiting me... and see you tomorrow too... love, Light and Peace...Bonnie
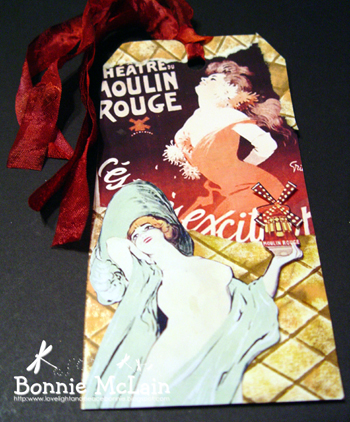
Our son Loves the movie Moulin rouge... so I decided to do a few tags for him of Moulin Rouge... I love these old vintage advertisements of Moulin Rouge... so I collage a few of the girls from some... I used a piece of card stock that I had creased every 1/2 inch... and then ran Distress Inks over to create this warm colored back ground... a very simple tag to say the least...
Thanks for stopping by ... see you tomorrow???
Love, Light and Peace...Bonnie
 |
| LOVE |
I really love this heart embossing folder by Cuttlebug... especially at this time of the year...
So I started out with a manilla tag... and embossed it and then used some Distress Ink pads to color around the edges... and then used a distress stain on the center of the tag...
I had stamped a piece of card stock with Tim's new Valentine stamp... and had been cutting words out when I wanted to use them... these two were a little too soft.. so I used the Victorian Velvet Distress Stickles over the letters... Sweet Valentine... I used the Silver tape to create the stacked LOVE... (refer to January 23 post...) and then used a stamp from ages ago for the cupid vintage clip art to sit upon... a simple and easy tag... of course I used my seam binding tape and some ink that matched the tag...
What do you think... sweet enough...????
Thanks for stopping by... leave a message if you can... and let me know what you think... do you like this series of tags...????
have a fun day... I am going to be sewing today a little... as I am creating a quilt making my own fabrics... dying, and playing... will start to show you some of the squares soon...
Love, Light and Peace... Bonnie
Another really detailed background for me... and I love doing these too... what a shame... huh???
Okay... I started off with a couple of colors and a fine mist of water on my worksheet... and then a few stamps... using different archival inks... a little clip art... and a little rosette... and I have really into the throws of it all...
When I found an old dictionary I refused to tear the pages out to use... so I copied them... and will always have the pages and book!!!
I used a lot of distress stickles on the words and the rosette...
Thanks for stopping by and for all the comments and e-mails ya'll send me... Love them all...
Love, Light and Peace...Bonnie
Sometimes a technique really allows you to create some amazing things with it... this is one of those techniques... I love creating using this one... So I love to share it too...
Saturday a group of my friends were all suppose to come over and play... but we had tornado warnings and all decided to wait until Sunday to play... which was good, as it was still a cloudy, rainy type of day and I sort of think that allows us all to play better... dont' you???
Anyway... we did have a nice time... and we were all working on different things but we also enjoyed sharing different techniques too... April showed us how to make a really cute little 'basket' using a square piece of paper... and then I showed how to create 'bleach spots' using water... a fun Tim Technique... and then I wanted to share this fun Alcohol ink and plastic technique... so we did it... everyone had fun doing it... I wish that I had taken a picture of Susan's pieces as you will not be able to see them... but her's were really nice too...
You will be able to see April's projects here... as she is doing a project for SparkleNSprinkle here
Always a fun thing to see how others create with the same technique... so I have included here a few other links for you to enjoy too...
Marie was here playing too... and this is where you can her's .
Of course we have to give credit where credit is due.... Tim Holtz does a fun 12 Tags of Christmas starting on December 1st... and of course most of you know that I loved doing them this year... you can see them all by going to my newest blog... Christmas Loverlies and on the right you will see a section that will allow you to see all the tags that I created for this 12 days of hard learning and playing... loved every minute of it too... WOW.. what fun it was.
Anyway on the 5th Day... Tim did this fun technique and I made quite a few things doing it... and I wanted to share this technique and spread the good news... as it is a FUN way to create different things with it...
So here is my tag... that I created on December 5th...
The nice part about it is that if you don't like what you have created you can erase it with solvent!!! How neat is that... love it even better...
Okay... now Linda Ledbetter who happens to also LOVE Tim's techniques does a wonderful blog and she has a challenge using Tim's techniques every Monday... called GRUNGY MONDAY.... I happen to love doing these challenges... as I love getting grungy!!!
On January 16th she challenged us again to use this technique... so by going to this challenge you will also see quite a few more pieces of creations using this technique too... and so I created this necklace for this challenge... I have not wore it yet... but do have it hanging up to wear soon...
I also wanted to do something special for Simon Says Stamp and Show challenge so I created this little scrapbook of my Grandson's birth... and this is the cover... So after seeing all these fun things you can create is your mind spinning???
On Sunday when April, Marie, and Susan all came over to play I also created a few things using this technique... and these are them...
I love using the little fractual pieces of Idea-ology but also you can use sheets of plastic... yes the packaging sheets are GREAT to use... you are helping by keeping this stuff out of the landfills..... and also creating something special with it... so if you haven't already got a stash... I know that you will start one NOW...
I used sheets of plastic for these two projects...
This tag is for a few challenges ..
Last week on Grungy Monday Linda wanted us to use this technique... so I obviously did get very involved with this Linda... thanks for the reminder... love it... But then this week Hels Sheridan at Sunday Stamper wanted us to do faces... so here it is... faces... what could be more perfect... lovers faces... and then on Simon Says Stamp and Show they are asking for a song title... so this tags name is Michelle, My Belle... by the beatles... love that song... and I am singing it right now... I only know parts... but I am singing it all ... even the ya ya ya's... LOL...
A close up of the faces... so very delicate... the vintage clip art is really fun...
My tag was created by using a few colors of brown.... Latte and Hazelnut alcohol by Ranger... You will love all the colors... but these are two that I used for this sheet... then I used a few Tapestry stamps for the relief... When you try this technique you might think it is difficult and not try it... dont' limit your experiences .... this is so easy a child can do it... the hardest part is gathering all the things you need to use... and moving quickly to remove the black archival ink... LOL.. that is the fun part too... it is so amazing...
I do hope you will try it...
Okay... then I used some inks that April and Susan had on their blending tools... and created a sheet of pretties... and then I again used a stamp that April had on her acrylic block... and randomly stamped all over the plastic... creating this fun piece of plastic... then I cut it up into 1x1 inch squares... and made this little box for putting all the pieces onto it... I used Glossy Accents to cover and protect the little squares... Love the look of this... and it will go into my pile of Christmas presents for 2012... Yes I have already started on making a few gifts... a couple each month will give me a head start...
Well I know this has been a long blog.. but hopefully a fun one for you... I know that I had fun creating and doing all these things... and hope you will try this one... it is so much fun.
Have a fun day creating something special for a special someone too... and thanks for stopping by for a visit... please look at my Valentine tags.. each day there will be a new one until February 14th... and hopefully by then I will have another special for you too... you never know what will happen...
Love, Light and Peace...Bonnie
I have a problem with just doing one thing for each challenge... don't even try anymore to do just one... I am just so into making things... LOL.. just my way...
So this is for two challenges...
Simon Says Stamp and Show... and also for Grungy Monday...
Simon Says Stamp and Show... is to create a project using a song title... and Grungy Monday is to use crackle... so I used it on the heart...
Any of course this is also another Valentine tag for my collection... I love all of them... and it will be hard to give them away... but I am making them to do just that...
Happy Valentines DAY ... to YOU... a little early??? Oh well... it is never too early for LOVE from the heart... give it freely to all... Have great day... play hardy and enjoy it all... thanks for stopping by... and hope you can play today...
Love, Light and Peace...Bonnie
Three challenges that I LOVE to do each and every week... hope I can keep up to it now... as I am starting to work on my quilting... and will be using my inks, stamps, creativeness on that piece of my life...
But until then... here is a tag that I made to include three challenges...
Sunday Stamper... Show a face
Simon Says Stamp and Show ... which is to do a title of a song... EARTH ANGEL
Grungy Monday... to crackle... which I did... as you can see in the picture below...
Here is the tag prior to all the embellishments... I really loved it... and wanted to share it prior to putting everything on it...
I used distress inks and colored it... then used some Perfect pearl mists and then I used some Impression Obsession stamps for the writing... okay... they I went wild with some tapestry stamps.... then I crackled it...
Added some Silver misting... and then started to add my other embellishments... like the tea bag folding on the top edge of the tag... ooops... I didn't take a close
up picture... sorry...
Then I added a little bow under the picture of the earth angel... and a stick pin that my Friend Marie bought...
Maybe you can see the crackle here a little better...
And I added a dragonfly gold sticker... just for the earth part along with the flowers...
Love the blues, greens and gold on this tag... all earthly colors don't you think???
Hope you have a fun day today... and thanks for stopping by for a look see...
Love, Light and Peace... Bonnie
I love creating different backgrounds... and this one was really fun... I love to create tag backgrounds with different inks... and so this was tag that I must have
inked a long time ago... I then embossed it... and used a resist pad over the flowers... and heat embossed with white embossing powder...
What a great texture, and look it has in real life...
I took some heat vent tape... (go to Home Depot or Lowe's and buy a roll... not expensive and you can make tons of embellishments with it... I peel it off and put onto card stock and you have a wonderful metallic paper... you can even use alcohol inks on them... really GREAT... and so very inexpensive too!!! ) and created the Stacked LOVE... and added some Vintage clip art... and a word from the Valentine Stamp that Tim released... love it too.. A simple yet fun tag...
Hope you are thinking LOVE and Valentines day... a fun time of the year... Thanks for stopping by... and please dont' forget that I will be doing Valentines until February 14th.. something new every day... So please stop back...
Love, Light and Peace...Bonnie
 |
| At the Gate |
I love making tags... and find that with each holiday I can make a ton and never get tired of the theme... but with cards I use to really tire after a few of each... But now I have given our kids and my Mom a plate holder and send them some tags and they can display them as they desire... what fun... I should save some for me too... think I will this holiday...
I love the background on this tag... I used the heart Cuttlebug embossing folder ... and then sprayed with Raisin Color wash... and then used A brown stain??? can't remember which one... but a nice dark one... and then lightly went over some areas with my black archival ink pad... love it... you can see it better in the bottom photo...
I used some vintage clip art to accent areas... and the picture its self is of course vintage... I used a Martha Stewart punch for the border...
A friend had sent my the corrugated paper in an envelope so that the tag she sent wouldn't get bent... and so I used it ... I would not throw something like that out... too good...
Hope you can get started with some Valentines day things... it is such a loving time of the year... all the reds and bright colors are wonderful to work with...
Thanks so much for stopping by for a visit... and I hope that you have a really GREAT day... Love, Light and Peace...Bonnie
I have really enjoyed making all the holiday items this past year... and I wanted to have them available for you to look at when ever you desired... me too.. as I love looking at what I did... and keep on learning the techniques and all the things that I did... you should never stop learning..SOOOOOOO here it is ... a blog all about CHRISTMAS....
On the right hand side of this blog you will see pictures... each one is another blog that I have... LOL... I love blogging...
Anyway... each one will take you to a different location... the first one will take you to my publisher... you can buy one of the books I have published... or even download one into your computer... what fun...
The next one is called Christmas Loverlies... and that is the new one... click on the right hand side to see all the pictures...You will find all the info back on this blog... but the pictures are all there...
Art Between the Pages is all about books that I have made.. and also others...
Pretties by Bonnie is digital art that will enhance your projects... glad that so many of you enjoy it... I love using these for special projects...
Medallion art is Tea Bag Folding... which I still love to do... I have CD's available with tons of tea bags... and examples of cards... and over 40 different folds...
Pictures of our farm can be seen at Sunshine Valley Organic Farm site... and then some of the recipes are on Good Eating...
So I do hope that you will take a look see... and thanks again for visiting...
Have a great day... and enjoy what you are doing...
Love, Light and Peace...Bonnie
What a fun thing to create for a book cover!!! I wanted to do a few more of these little plastic tiles for a book cover... this book is only 4X5 and so perfect for what I am doing with it... It is the first little book of my grandsons birth.. I didn't like the first one I did... so I am really redoing it... LOL... not that I dont' have more and other things to do... just wanted to re-do this one...
The cover of the book was purple... which I loved.. but I used Twinkling H20's and covered the purple... then I added alittle strip of My Minds eye paper... adn then a Martha Stewart border ... now that is where I added the GOLD for this project... As on Sunday Stamper we are to add GOLD.... it is there... hope you can see it...
Simon Says Stamp and Show challenge this week is to create anything other than a card... so this is not a card... that is for sure... and this is perfect for the cover of this sweet little book...
The Tiles are for Grungy Monday... Linda loves doing Tim's Techniques (as do I) and this is a great one. When I first did it, I thought it wouldn't work... but it certainly did... love it... Try this technique... you will love it... a little alcohol ink... a little plastic, and you will have fun... I am going to try this with a sheet of packaging today... I have not done anything really large and want to try it... These pieces were made with three colors of blue and a little green... so it is was a multi colored thing... love blending the inks too... what don't I like??? CLEANING.... LOL... actually I really do like it... but prefer my studio... dont' you???
I used Tapestry stamps as I wanted to create a small design for this small book... and I do love the feeling of it... sort of a small batik design.... Anyway... that is project for today...
Some gals have written asking if I have started my quilting... which I have not at all started... a few set backs... our kids were here for a week... and our son and his family are leaving I think today... so we are just finishing up with our Christmas time together... it has been fun and we all loved all the gifts that we had all made and bought from all over the world... I will share a few later on this week... have to get my life re-situated again... LOL I do know that you all understand that... that is an understatement...
My quilt is waiting for the fabric to arrive... and then it was canceled ... so I am having to find the muslin I want to use again... so am waiting on finding that... it will be a long project for this winter and most likely a years time... you will see the panels on my blog... don't worry about that ... I will share.
Hope that you have a wonderful day... stay safe and happy and remember to enjoy life...
Love, Light and Peace..Bonnie
Oh wow... what a way to start out this week... I just had all of my family here for a week... and am now trying to catch my breath and reclaim my SPACE... LOL.... my self is more like it... anyway... we totally enjoyed every minute of their visit...
So when I checked out the challenges today... I saw that I was in LUCK... as I am making presents for next year already...
Sunday Stamper challenge .... Hels asked that we use GOLD... so I used gold wire to create the flower on the top of this charm...
Grungy Monday.... to use a technique of Tim Holtz's with alcohol ink and archival inks... with plastic... Love this one...
Simon Says Stamp and Show... to make anything other than a card...
So all of these fit into one project... A pendant for a necklace!!!
I took a couple of pictures of this... as it was very difficult to photograph with the Pool Alcohol inks...As you might be able to see I did use some really fun stamps... they are Tapestry Stamps... they are nice and small and I could stamp the flowers where I wanted them... and then a leaf spray and of course a dragonfly...
This picture was taken with a white background and it looks entirely different... but of course it is the same pendant... the flower on the top is just gold wire formed to create the flower... and the back of the pendant is white... which has been treated with glossy accent...
I love making fun things like this... Hope that you will give this technique a try too... it is really fun.
Have a fun day... create something creative and enjoyable for someone else... Thanks for stopping by for a visit... and hope you will come back tomorrow... Love, Light and Peace...Bonnie
In the year 1913 my Maternal grandparents got married... things were a little bit different back in the day... than they certainly are today. The records of such things were done entirely different then too... They got married where my Grandmother grew up... which was Orrs Island in Maine. Very quaint and quiet little place.
My mother who is now 92 was cleaning out some things and she knew that I would love this little wedding book of my Grandmothers... and it is really a very precious and pretty little book... about 5 x 7 inches and papers starting to crumble. but I did take pictures of each and every page... and was able to preserve them. I also come across a letter my sweet Nana had written to her brother and sister in law when on her honeymoon in NYC!!! So I decided to make this card for my Mom, so she could have that again...On the front, I used a section of the book (violets) and enlarged it and popped up the violets for the front... I made a little pocket for the letter to fit into...
This is the next two sections of this 4 page accordion book... I used My Minds Eye lost and found paper on this section... and added a little bird with wings onto another pocket... now this pocket holds a copy of the wedding certificate...
I made the little flags and flowers to decorate the paper... and of course make it a little more like something I would LOVE... The letters are from my Mothers old scrabble game... I colored them with Picket Fence stain and then used a black marker to color in the letters... worked great...
This is a copy of the wedding certificate... Down at the lower left corner were the signatures of my great grandmother and grandfather, whom I knew both of them very well... as we spent a lot of summers in Maine as I was growing up. Also the minister signed it on the right... This is THE certificate...
A close up of the little flowers ... with Pearls in the center... These are flowers from Pretties by Bonnie as I wanted to really put a little something more from me onto this...
A closeup of the letters and cute little bird... which was made from K&co paper... I love this punch of Marthas too... so sweet and delicate.
The top bird and banner area... I tore paper for the wings...
Now the last section of this book I really had a lot of fun with... layers and layers of paper that was punched with Martha's punches... and then this sweet picture which also came from the wedding book... which again I did enlarge and also popped a few of the flowers and the tiny little birds... LOL.. they are tiny too... about 1/4 of an inch... but I wanted that delicate look...
And I think I got it...
Well I hope to be back here soon.. but you never know... we are having all our family here for a week... so we will be very busy... also we are celebrating Heather Amy's birthday... wow... she is getting younger and younger... right sweetie???
Hope you have a fun time... and thanks again for visiting... see you all soon... at least with some new things...
Love, Light and Peace...Bonnie
Another tag for Grungy Monday 's challenge
This one is really a different tag than I have ever done... but wanted to get a lot of techniques onto ONE tag... and I got at least 7... maybe you can find more....
Anyway... these are the ones I used...
We are to use techniques that Tim used on his 12 Tags of Christmas... but use other than Christmas themes...
So for the background I used the technique from Tag one...
And dyed seam binding from tag #2.
Tissue paper ruffle from tag #12.
And Glassine flowers from tag #7
I used canvas which I hadn't used and created the Love emblem... dyed it and then used glossy accent in the spaces... which were from #2 tag and #4 tag...
Then I created the banner... which was from tag #10...
My favorite one on this tag is the background one... love doing that... it is so GREAT... and really makes for a very dimensional background.
Speaking of dimension... I really have a lot on this tag... the banner is about one inch off the tag... and it is on top of flowers, that have been made from paper that I inked from my worksheet... and also that I made using re-inkers and Perfect pearls... the darker looking flowers are made from Glassine paper... which I used alcohol inks on... I used twilight purple and also pool... and then added a touch of gold here and there... in real life the flowers are really nice.. a little dark in the picture though... sorry about that... there is one larger one and two buds...
I loved using all these different techniques... if you haven't used any of the new ones I suggest that you take time from your schedule and start to make one at a time... they are each wonderful to play with... and really give you a lot of different ways to use the product which is GREAT in itself!!!
A lot of ways to use each and every technique... not just one way...
Well another fun day of playing... hope that you had a fun one too... and hope that you will stop back soon... always fun here... and making something to create a mess in my studio... LOL...
Love, Light and Peace... Bonnie
Grungy Monday...Linda really got me on this one...
The Challenge is to use some of Tim's Techniques that were used on the 12 Tags of Christmas... so that meant I had to make a decision!!! not a good thing for me to do today... LOL... Way too many techniques... and I love them all... so I started off choosing which ones I hadn't used for over a week!!!
On January 1st I used Tissue tape, and glossy accents on the box... and then on the 2nd I used all kinds of techniques for paper pieces for the Patchwork Pandominium Framed art work... and then Tissue flowers on the New and Old Stripes for the Altered Alice piece... and I used letters on Tim's Birthday card... also a lot of folder embossing... On January 3rd... I used tissue wrap on the little santa house... that was really fun...
On the altered Address Box I used inking and letters... and of course I had to buy some new dies... so I got the letters of Upon a time... and Tag and Tab die... love that one... and the stamp of Letters to Santa... which as you know I will be using year round the words... love it...
I made a forest of little trees from the Rosettes and that brings me up to here... so I have been having fun with the techniques already .... and putting them into my daily usage... as much as I can... that is the only way you make them part of your work...
So on this tag... I used the technique from Day #9 .... I stamped a 6x6 Impression Obsession background tag with Victorian Velvet... and then quickly used Clear embossing powder on it... and heat gunned it... then I used Brushed Corduroy on the blending tool for the edges and background... there are areas, which are now covered up, that were left white... I love that look.. and maybe if I didn't get so carried away with adding all these fun things you could see it...
You can see the background here a little bit more... and then also the Just Rite stamp. which I colored with some very soft markers... the paper flowers are soft too...
The Rosettes are made with paper from My Minds Eye and Prima... I took 6x6 papers and glued them together so they would make the nice rosettes... and then used a pearl on the center... to match the ones along the tissue ruffle... I used a piece of seam binding tape for the vine... which was colored with a stain... and I think it was Shabby shutters??? not really sure right now...
I used some Idea-ology too... the Trinket pin and the word token... Moments...
And then used as stated above the tissue paper on a roll for the ruffle... love that... and a little Martha Stewart paper lace...
Of course the main mannequin is made from a Tim die... and I used sticky back canvas... which I distressed and then inked with Victorian Velvet and Antique Linen Stains... Is this frilly or what... I love it... but it all started out with the wonderful background... so it couldn't help but be fun to play with...
Thanks for stopping by for a visit and please go to Grungy Monday and see all the pretties... and also stop by Tim's site for more fun and wonderful eye candy.
Have a fun day... see you tomorrow with more things...
Love, Light and Peace...Bonnie
I had to do one of these Movie Tins!!! And I simply LOVED the movie Burlesque... so I combined the two of them... If you have not seen the Movie Burlesque... see it... it is really a very good movie... there is not a part I didn't like... a loving, sexy, and Fun movie... So I went to the internet to find some pictures of the movie... and then used the Pad of paper from Graphic 45 called Curtain Call... which was really perfect for this theme... and just love it with the tin... The colors are just what I wanted too...
The Trim on the tin top and bottom also worked out great... one whole spool... and nothing left over... used the whole thing... Diamonds and Gold... again just what I wanted... bling and all..
The first page you see when you open the tin... Very dramatic with all the makings of a good show... The medallion also just fits into the scheme of things...
This week on Simon Says Stamp and Show... the theme is Red Letter Day... I was going to do something entirely different... but wanted to make a statement with these Red Letters.... I used Upon a Time Die from Tim's line of great die cuts... and then stamped words on some... (from the stamp set called letters to Santa... I told you I love these words and would use them all the time... ) and then colored them... a little mini misters and ink and perfect pearls... just the look... As you can see this panel opens to show the next pictures... I used a layered over and round spellbinder for the effect I got here...
Cher really was quite elegant in the movie... I totally enjoyed her... quite different from any other movie she has done...
I think this is one of my favorite sections of this project...
I loved this scene... in I am a Good Girl... I used some of Tims letters... and then some spellbinders behind the pictures... I used some pink tulle on the page too... as in this scene she was really foo foo looking...
This week on Sunday Stamper, Hels Sheridan asked that we use TIME as the theme... so here is some time... another favorite dance and outfit.. so very unique and wild... love this...
Really a cute time in the movie... Oh Jack... how could you... but these are Pajamas that my Mom sent me!!!!
So much fun...
This movie tin fold out has 6 circles and so that means room for 12 sections... I really did enjoy doing them all... and this is the last one I am sharing at this time... I made the keys of the piano open... to show more pictures also... but loved the outfit in this scene.. all pearls... so I added pearls to the piano.. just to 'dress' it up a little bit... what fun is this...
Thanks for stopping by today... have a wonderful Monday... and see you back here later... more will be coming... gotta do Grungy Monday!!!
Love, Light and Peace...Bonnie