Followers

Wednesday, August 25, 2010

Be Inspired #98 By the Sea


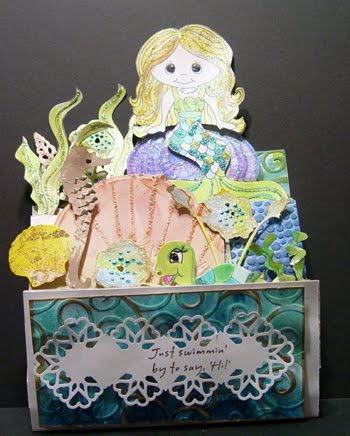
The front of the card...closed and ready for mailing.. then you open and you see this.....

Oh what fun I had with this challenge...
First off...
the Images are by Digital Delights by Louby Loo
And they are so adorable... I just might have to make a few more cards for this challenge to share with you the images... they are really precious..
I usually do a little more realistic style of card... but these were really fun to play with... and
Play I did...

First off... I built a card that has 4 layers to it... you will see as you really study the card...
Lots of Cuttlbebug folders have been used...
Shell collage 37-1611
D'vine Swirl 37-1142
Tiny Mosaic 37-1146
Polka Dots 20-00207
Then I used some of the cutting dies... Such as the one with the shell and seahorses...
Which is 37-1120... Love that... it is so versatile. I use it far more than I ever thought I would..
Also the poppy one with the Honey comb... and I don't have that number...

The other items... like the adorable Mermaid, the Turtle, and the Grasses are all
Digital Delights by Louby Lou... Of course with a digital image, you can make these any size YOU choose to make them.. so it was fun... I made them a little bit larger, as this card is 6 inches wide ... and about 9 inches tall.. a little bit more... but close enough...


I took pictures of the card in sections... so that maybe you can see it a little bit better...
I am on dial up... ugh.. so I have to limit my size of picture.... sorry .. but it is the best I can do now... maybe sometime IF I ever get the opportunity to get this higher speed you will see the details of each little thing..
I have used Dimensional Pearls on this card all over...
Also Stickles by Tim Holtz, and also the regular ones... so the card does have a wonderful glimmer to it..


Here is the center of the card... with the cute little turtle... and his friends all around him ...
The large shell behind the seahorse is a cuttlebug folder... wow.. I love it like this..

And then the bottom that folds up so that when the card is ready for mailing it looks like the very first picture...
But from the side... it looks like this.. 1/2 inch between each section..
Love the style... and it is really a dimensional card... I have most items all popped too.. so each layer is 3D too..

What fun this was.. Thanks a lot LoubyLoo for the delightful Cahllenge...
Please go to Cuttlebug Challenge and partake of this Be Inspired Challenge... it is fun... and check out Digial Delights by LoubyLoo too.. what fun I have had with these fun critters..

Hope you have enjoyed this card as much as I did creating it...
Have a great day...
Make something special for someone special in your life..

I live, I create, I am
Love, Light and Peace...Bonnie

Tuesday, August 24, 2010

Frilly and fun

This week Mother Marks Famous Tea Pot Tuesday challenge is to make a card for this gal that needs some uplifting spirit energy work... She also loves The Unsinkable Molly Brown... as her grandmother works at the Museum of the Unsinkable Molly Brown.. So we are suppose to do a card with a lot of GREENS... ooopps... mine is a lot of PINKS... but it is suppose to frilly.. and lovely, and feminine and mine is all of those so I guess it will pass..
Above is the front of the card... I used Cuttlebug Embossing Plus folder called Brocade Door
as I love the effect of that rich embossing... and the opening.. .
I put some flowers by Pretties by Bonnie around the bottom of the card..
Of course I painted the digital flowers with my twinkling H20's.. and because they are digital, I was able to use the same pattern and make two different size flowers...
Now one thing I have found to be really nice with flowers... is that if you make the top flower a little bit smaller, you can really give dimension to the flower in so many additional ways... so actually there are 4 different size flowers...
I used Liquid pearl by Ranger around the centers of the flower... and then put a pearl in the center to make a statement...
The leaves are from the Dogwood Digital set... You can so mix and match all the flowers, leaves, branches etc... really a lot of fun to play with and use..
As you can see I have a nice big pink bow on the side to close the card... more frills.. that is all.


When you open the card, you will see this.. .
The background is a lime sheet of cardstock punched with Martha's flower punches...
Then a pretty pink floral paper... a little old fashioned, yet really new...
Then I used a spellbinder oval scalloped to frame the white oval..
On the pink I added a pearl for each scallop... more frills.
and then on the white oval, I used a cute border from Just Rite Stamps.. Love them
The woman??? I don't know where I got her from... but isn't she wonderful...
In all her regal-ness... large brim hat, flowers all over her... and a lovely rose at her neck...
So prim and proper she is sitting there...
Reminds me of the Unsinkable Molly Brown..
So that's the card for Tea Pot Tuesday...
Thanks for taking a look.. more cards will follow soon...
In fact tomorrow there is a fun Under the Sea card... check it out...
Thanks for stopping by... and love to have you visit..
Love, Light and Peace...Bonnie

Saturday, August 21, 2010

Fun at Group meeting


This past week the group I belong to... Whipperstampers, in Hendersonville, NC
had a great meeting... we were very casual this night... and very relaxed meeting.. it was great..
Anyway... I asked some of the gals to bring ideas that they could share with the rest of us... and Sharon Capp-Hill brought this GREAT idea... and I wanted to share it with y'all....
She took a background stamp and with Platinum Brillance, stamped on glossy paper...
ALLOWING IT TO DRY OVERNIGHT... it gives a slight raised effect.. very pretty too.
I have taken a picture so that you can see the background stamping... which is in the Label 10 area of this card... The stamp she used is a Stampin Up stamp... 'FROM YEARS AGO" says Sharon...
We then took a solid stamp and with markers colored it and then huffed on it... and stamped...
which gives you this effect... it is lovely...
I promised Sharon that I would share the card I made... so here it is..


I used a Cuttlebug folder called Scroll work... and used glossy paper also... then with a silver marker, marked all the lines... but missed at times.. but generally covered all the lines... then punched a frame and mounted all with pop dots...
Yes I buy a lot of them... and I don't own a pop dot company either... LOL..
I added some Krinkle metallic paper on the ends.. and mounted it all onto the 5x7 card base..
I also used a scrap of the paper that Sharon make and made the other butterfly... One problem... I didn't have the same colored markers... as I borrowed Renee's markers... thanks Renee...
Anyway.. I added a few gem stones on the top and bottom and the card was finished...
Hope you like what I did with this Sharon... I love the technique... and hope others will try it...
Just say thanks to Sharon for this one..
It is really a lovely technique...
Thanks again...
And thank you for stopping by for a visit... come back again soon..
Love, Light and Peace...Bonnie

Friday, August 20, 2010

Calendar page for 2011

I just wanted to share with you all the lovely calendar that the Fat Book Group made for the coming year... each month we make a Fat Book... which have a theme... and everyone makes a page for each gal that joins into that theme... Each page is 6x6 inches... and each book is really quite lovely... Thus the name Fat Book... as the books are FAT... with lovely pages..
Each year we take one of the months and create a calendar... that was this months book...
I wanted to share it with you as it is the best we have ever created...

So please take a short trip over to
ART BETWEEN THE PAGES
to see all the pages...
They are lovely.

Thanks again to all the creative gals that made and
created a WONDERFUL page...
Some of the gals were not there to receive theirs... but they will be getting them in the mail.. so hold on... but until then... enjoy these pictures..

Wednesday, August 18, 2010

Be Inspired #97 Book it...


Now this is fun.. no challenge at all.. sheer pure FUN...
Books... I love to make books of all kinds...
In fact.. .I am going to take you to where I stash a few...
So come with me to see the inside of this book..
ART BETWEEN THE PAGES...
Hope you enjoy this blog..
it's just another section of my life...

I live, I create, I am..
Love, Light and Peace...Bonnie

Tuesday, August 17, 2010

Happy Tuesday!!! Two Challenges !!!

I love to do challenges... and have not had the time for the past few months... way too much on my plate... as they say... But today I made the time... and I guess that is what I am going to have to do... as I loved making each and every card...
This top one!!!! Okay... many facets..
It is from my CD All Seasons... the picture and the ta bag tiles are both on the CD... along with 100's more pictures and 1000's of tiles...
I copied the picture the right size I wanted, and cut it out... and then I made the two medallions.. one for the front of the card... and the other one for the inside..
I also followed the Sketch design from Midnight Madness...
and so I needed to have an oval and two pieces on the front... so as you can see, I have added them... and added a little of Martha Stewart punching along the center and the edge of the card..
Three ribbons for the Sketch design.. and I was happy...
Now the other Challenge this is for is the Color Challenge... Betty picked the most wonderful colors today... Cherry, Pink and Artichoke... I might have these names wrong... but you get the idea... as they are on my card... I used the colors on the entire card... but also for the ribbons... I loved using these colors... MY COLORS BETTY!!!! Thanks ...
I didn't add the use of pinking shears... as I really forgot until I just saw it... oooops...
Oh well the colors are delicious.. and I love the card..

So that is two Challenges...
The third challenge is for Tea Pot Tuesday... and the challenge was for a little boy named Dante...
He is in the hospital... and just had a bone marrow transplant.. he received it from his little sister... he is only 8... so I don't know how young she is... but I made them cards...
That was the challenge today... a card for Dante... who likes to FISH!!!

My Fish... it was made naturally with a Fred Mullet Stamp... and I used a lot of different embossing powders to get his main colors... then I used Twinkling H20's to paint him... all the way that Fred teaches with these wonderful fish stamps... I love these... and think I have most of them... they are wonderful gifts for men...!!!!
Anyway.. .I get so carried away..
I then scanned him... and shrunk the fish so that he could fit onto the card...
Created some ovals with Spellbinders... and mounted with the same.. Label 10.
The background... oh fun again... Paper painted with H20's... and then thru the Cuttlebug with D'vine Swirl Folder... accented it with a gold pen..
Then I used one of the tiles from him also... and created the medallion... which has 80 folds to it.. and with each of the folds... I said a prayer of healing for this little one... Dante... and his family.. that they all heal... and can learn from this to live a happy and healthy life together..

Put all together and it is a lovely card for Dante!!!!
I would love to share his address with you also... so that you can send a card too.. the more the merrier for this little one... You all have so many... and sending him one, would make him so very happy... Thanks ...
His address:
Dante Erk
c/o Tara Dalton
520 Brushy Mount Road
Gretna, Virginia 24557

I made this little one for his sister Julia... who also gave him the bone marrow... how sweet of her... another medallion with 80 folds and hugs and happiness to her..


About two weeks ago or so... how time does fly??? I joined in on the annual fun time of SplitCoast Stampers... and as a member was given 33 challenges... you could combine them ... and I did with some of them.. but did manage to make 26 or so cards for the 33 challenges... and I was crowned a QUEEN...
My prizes arrived yesterday.. and here they are..
A Lovely card , hand made... but Understand BLUE... I thank you so very much...
also .. a stamp from Taylored Expressions and also from SCS... and a roll of tape... great useful gifts... thanks again.. I will certainly use them all..

So that is my day so far...
Have a few things to do for the house/farm... like can a little... we still have a lot of produce coming it... okra, cantelope which is delicious... and also blueberries... ymmmmm mixed... wow off the charts... and then more zucchini, beans and cukes... so gotta get busy..
Talk later...
Hope you all have a wonderful day...
Thanks for taking time to stop by my blog...
Love, Light and Peace...Bonnie

Monday, August 16, 2010

Twinkling H20 paper


I decided that I wanted to take the time and get back into doing some challenges on SCS... so I joined in on the Saturday Challenge, which is where we go to a web site and find something that inspires me... most of the time, I am inspired prior to looking... but did find this really pretty Lavender bath salts... so I thought that is what I am going to do... Well the top card is nothing like that at all.. but the back ground paper is all from the same sheet of paper... as I used half a sheet on each card...
I basically did both of the cards the same... but .... I will tell you what happened...

I started to paint... and before I knew it, I had quite a few sheets of paper filled with paints... I love painting with Twinkling H20's... and it was a nice rainy day... what could have been more perfect... so I painted and painted and then really had forgotten that I was going to do the challenge...

So I picked up my ball point pen... and drew some leaves..on one of the lavender sheets of paper, which is what I wanted to do in the first place...
Then on the first card (the one on the bottom here...) I painted the leaves with purples and lavenders... and then touched them up with white and gold... love the way it turned it.. I mounted it on a Martha punched border... and then added the little bows... a fun card... I love it.
The next card (the one on the top) I also drew the leaves... and then took white copic to color the leaves... now all the background color was gone!!! Then I added the greens to the leaves... I roughed up the edges... and thought it needed something... I had a few dried flowers from a previous project on my work table... and so I glued them into place... Twisted loosely some ribbon and added a bow... DONE!!!!
I really had fun with these cards..
Hope that you have a nice MONDAY...
And thanks so much for stopping in for a visit...
Love, Light and Peace...Bonnie

Saturday, August 14, 2010

ANNOUNCING .... NEW BLOGS

Okay... so maybe I love making blogs... but the truth of the matter is that I love sharing what I create with everyone... I have some blogs up right now...

The first Link... or area that you can go to, to see some of my work, is at my publisher.. LULU... and I have a storefront there, where you can click on the book you desire and it is sent to you..
I have published 18 books... I am very proud of them all.. I have doodled most of my life.. .and after much nagging from a lot of friends, family and others... I put them into books... I also published a book of poems that my maternal Grandfather wrote... Also a few books on how to fold Tea Bag Medallions... and then a few cook books.. which are really a combination of Art books and cook books... more on that later... but you can visit and shop at Lulu... and they will ship the books directly to your home... or you can order any of my books on line, at any book store... Amazon.com or anyother book site you love... the choice is yours...

The second one after this was Pretties by Bonnie...
A place where my images can be sold to people that would like to use them... I love to layer flowers... so this is a place where you can find flowers to layer, leaves in wreaths, holly wreaths for the holidays... and also a pretty poinsettia... so take a visit there... I also have a few of my doodles... but maybe more will be up and coming... I have had a lot of requests... just not enough time???

Then I wanted to share our Farm with you... Sunshine Valley Organic Farm... Where did the name come from... I have been called Sunshine by a lot of people... and Glenn means Valley... so Sunshine Valley... a combination of the two of us... a place where we live, and grow... and try to become more self sustaining every week... slowly but surely...


Well now can I have a place where I put just SOME of my art..???? So I had to add a place to show my books... and also others that partake in a group that we call the Fat Book Group.. This can all be found at Art Between The Pages... I do have a lot of things there... also a book group that started just a few months ago... and we call ourselves the Pearly Girls... hope we can do another group..

Okay... so I am on a roll now... I need to share some TOYs... so I start to offer a few items that are sold in my studio store... and I add TOYZ 4 PAPER... a fun place to shop... and buy your toyz at below retail price... So take a tour and see what I have there... you actually can shop on line... and tell me what you desire to have... and a letter via E-mail will get you all the new TOYZ you desire... (bongem@earthlink.net)

Which brings us to the two new BLOGS that I am going to share with you today... One of the many things that I love to do is COOK...about 3o years ago, we became vegans...I really didn't know what to make...so I started to look for ways to create delicious meals from foods that I really didn't know anything about... WHOLE FOODS... I was one of those people who would open the freezer door... take out a veggie, a meat... and then decide which starch to have with it.. Standard American Diet... (SAD) so... I had to take control of my life... and my families and create gourmet dishes... that tasted good... that were good for us... and were cost effective... YIKES... Over the years, I had quite a collection of recipes... so when we moved here in 2002, I decided to put my recipes and my art together... and create a collaged cookbook.. I made over 300 collaged pages... and put 300 recipes.. one on each page... pictures of family and friends also were added to the pages.... and I was done.. two years of hard work... and then it took another year to figure out the computer programs so I could publish them!!!! WOW ... I did it... and 18 books later... I am now learning the Blogging world... so much fun..

So that brings me to my next BLOG... Good Eating ... I eat a little bit differently today... we do eat some flesh products... not many... but some.. We eat chicken once in a blue moon... Organic Bison... and Raw Jersey Cheese... and if we can find organic raw milk that also... butter from Ireland... and we just added locally grown organic bacon.. oh my goodness... what a list..
And of course all our veggies that are grown on the FARM... There are so many things that I want to share... and the other day our chiropractor... Gina Barros... located in Landrum, SC... (If you want a good Chiropractor... let me know.. .I will give you her number... very good... gets all the pains out... ) Who is vegan... asked if I had a good cheese cake recipe... and I said yes... so I started this blog... oh dear me... another blog.. but a blog that I will add recipes that I create and want to share with you and everyone else... so go there when you have some nice fresh produce... and see what I have done with it... I do eat in season... so you will have to take that into consideration too.. but there will be time, when I can add other recipes like the cheese cake one.. . I personally don't eat tofu today... but alot of people do... so enjoy this one... it is DELICIOUS... Good Eating..

Okay... as a lot of you know... I started this blog... because I wanted to share my cards with friends... and not have to lug them all around with me... I am very obsessive about playing with my paper... I love it... I have a nice studio.. which I might just take some pictures one of these days and share that space with you.. .????

Another one of my loves in paper art is Medallion Art... or Tea Bag Folding... I love it.. I joined a group of gals from all over the world on Yahoo... called Card Making Friends... and I loved each and everyone of them... I still connect with a lot of them... I formed a trading group of ATC's with some of them... we had a group in the USA and one in UK... that also had some gals from the Netherlands and other places... it was so much fun... and I truly miss them all.. I also joined another group... called the Tea Bag folding group... and there I met Penny Wessenauer... and we became daily friends... making tiles, cards... and both of our daughters became pregnant at the same time... so we became grandmothers togehter too.. so much fun... I started to make CD's to share and sell tea bag tiles and card ideas to some of these gals... I published about 30 or so... and the last one I made was with Penny... where she and I both created cards and tiles... and ideas of other things to make also.. .a fun CD... but that is about the time that I really felt the need to do my cookbooks.. so I pulled away from the Yahoo groups... and tea bag folding... and started down a different road... Which brings me to the next BLOG...Medallion Art another blog... all about Tea Bag folding... YEAH... I have come full circle... On this blog... you will hopefully see a lot of things... one it will be a place where I have taken a lot of my CD's.. .combined them... and will be selling them... I took three CD's... and have put them all together... the card examples are funny in them... I can see how much I have grown in card making... the purpose of the CD's is not to see how I have grown... but how to make Medallions... pretty medallions... and this YOU can do with the help of these CD's... on each CD there are over 50 different ways to create a medallion... direcitons on how to print tiles,... and also 100's of tiles... pictures that will match the tiles... and fun galore... I know that you will be amazed at all that I have on on one CD... but that is the fun of it all.. I also would love to have some of the gals that I am still in touch with who love to make tea Bag Medallions send me a SMALL card... (no larger than 500kb) and I will share them with you... another circle completed... so come Susan from Australia, and Sandra from NH.. and Nancy from Virginia... and Jane and Jean... and all you other gals that have bought CD's and have been playing with them for over 8 years now... help me to share these talents with others...

I do hope that I haven't been that long winded... as I know I can be... but hopefully you have been interested enough to read this... I love you all and want to share as much as I can of myself with each one of you... right down to the way I think... and even though you might not agree... you will get to know me... and also Glenn... who right now is making Kombucha... a fermented tea that is very healing... google it... find it in health food stores... and try it... it is delicious... we are making Ginger mint tonight... love it... it is my favorite...

So hope you will enjoy the opening of these two newest blogs.. check them out from time to time... and thank you so very much for visiting me...

I live, I create..... I am Love, Light and Peace...Bonnie
e-mail me at .... bongem@earthlink.net

Friday, August 13, 2010

Another NEW Blog


Well, I have finally done something that has been on my list for a long time...
I LOVE to make Tea Bag Medallions.. and about 6 years ago, I use to sell a lot of CD's filled with directions on how to create the medallions... Tea Bag tiles, grids so you can print them...
all kinds of things to do with Tea Bag folding...

So I revamped the CD's... merged a few onto each CD.... added some new cards... Left the older ones too.. and now have them available to you...
I will most likely be adding new ones.. but after this... I need to catch my breath...

I do hope that you will take a look... think about this Magnificent ART form...
and if you have any tea bags, create a medallion... add it to a card, scrapbook page, or gift box tag or something special... share the ART of folding...
That is what I am doing...
I do hope you will take an interest in this art form.. if for no other reason just to enjoy the cards I post here from time to time...
If you make Tea Bag Medallions, please contact me about sending a picture so that I can possibly post it on here... Thanks a million..

You can get to this site by the right side panel... just click on the Medallion Art panel, or by bookmarking
http://wwwmedallionart.blogspot.com

Thanks so very much... and don't forget to take a look at all the other blogs I have..
Wow.. I am starting to become a Blog Junkie...
Art between the Pages...
Pretties by Bonnie
Toyz 4 Paper
Sunshine Valley Organic Farm
and now Medallion Art....

Over the week-end I will be releasing another Blog..
Good Eating...
so if you love new recipes... you might enjoy this one too..
I live..... I create .... I am
Love, Light and Peace...Bonnie

Thursday, August 12, 2010

Quilling with Cuttlebug


Oh what fun this is... and also very easy... I love it.. I hope that you will take the time and look at some of the cards that I have made with quilled flowers ... there are many.. Cuttlebug has Three different kits... and I have all three available in my store... TOYZ 4 PAPER...so if you can't find them... I do have them for you..
The one above is the Daisy... that is the one I will be showing you today.. the others are just as nice... but I have found that I needed all three... as I mix the pedals in one flower... my flowers don't have to be real... just flowers.. !!!! I love them all.. You can see the name and number on each kit... so just write it down and e-mail that you desire them..
bongem@earthlink.net


Another needed thing in my mind is that you will need longer pads for your Cuttlebug... they do work a lot easier... but that is not a must ... use what you have ... and think about adding these to your tools..

When cutting with the Cuttlebug... you will keep A on the bottom, B next... then the template and then paper... and then C Real Easy... A B C...

This shows you the way it should look...

Okay....so lets get started... Using your templates... you should cut out some of the items you will need to make a flower...
NOTE: I have found... that using the EXACT SAME thickness will make a flower go together a lot nicer... using different thicknesses in one flower will make it splay out in funny ways... so use the same thickness on each flower..

I cut some white petals... and then some yellow centers.. I did sneak and made some from the mum too.. as I love the look of it... sorry... you will get the hang of this an want all three anyway..
You also need some quick drying white glue... and also your quilling tool... which comes in the kit.. now we are ready to begin.

Y
With a straight piece.. insert the end of it into the slit at the end of the tool.... and start to twirl.. Twirl even...and not real tight or too loose.. nice and easy..

When you are at the end.. put a little bit of glue on the end... and continue to twirl until it is all done...

As shown... the first layer is still on the tool and ready for the next layer.. I am using the mum single sheet...

I put a little bit too much glue on.. but you get the idea... and then attach that to the center..


And start to twirl that... I try and always go in the same direction... your choice... but the same

Getting to the end.. and keeping it even... not too tight or too loose.. even on the bottom as much as possible..

You can see the bottom here... and it is even.. (as much as possible. )

At the end... adding more glue to hold it closed...

And then we start with the white layer... the same as the other..

Adding a little glue... and then starting to twirl it onto the center..

Making sure the bottom is as even as possible.. keep on turning...

If you look closely at this flower... you want the petals to slightly be off to the side of the row prior... they should not be stacked on top of each other... you will get a funny looking flower... this will happen when you use different thicknesses of paper... so if you need to use different thicknesses of paper... I would suggest that you put some more center material down... or make 3-4 rounds of the petals... After you make a couple you will see what I am talking about.. and it will not be a problem for you.. you will know what to do about it..

As you can see ... my petals are totally uneven here... which is good.. the best ever..

Looking down into the center... you can see that the flower is starting to look really good.. the petals will be pretty...

Now CAREFULLY take it off the tool... allow the glue to dry for a few minutes... I know you are excited to see it.. but it will be ready in a few..

Then carefully pull the petals down... and open the flower up..

Opening all the way around it...CAREFULLY...

Then start to pull the center part down too..

Oh WOW... it is a daisy... I love it..

Nice and even... and the petals are evenly placed all around the center... due to the paper all being the SAME thickness.. .

This shows you how the two different centers will look on this particular flower....

Oh but for those that really know me... you know that I can't leave anything without adding something MORE to it...
So I take my favorite Ranger Liquid Pearls.. .and add some dimension to the center..


This picture will show you the centers... I love it.. just another dimension to the process of making a flower beautiful...

So there it is.. a simple daisy... that is so precious for any card... and there are thousands and thousands waiting for your hands to create.. .believe me... it is as easy as ABC..
I also will be carrying the Liquid Pearls in my store... so take a look from time to time as things get added...

Thanks for stopping by and seeing this tutorial... hope you have enjoyed it...
I Live.... I Create.... I Am
Love, Light and Peace...Bonnie