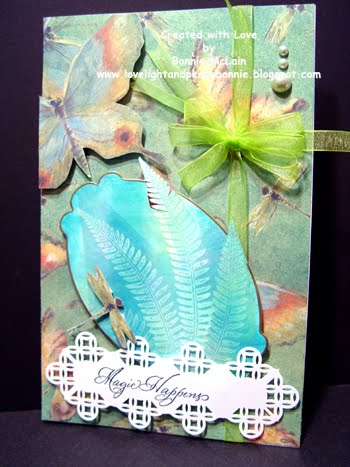
Wow... did I ever have fun with this project... !!! The Challenge was to make a project with some acrylic or acetate... if possible to recycle something... well that is the only acrylic or acetate I have... so that was not a problem for me... at all..
Be inspired #96... I do hope you try it.. because you might really enjoy this one..
I wanted to use some really large sheets that I had gotten the other day... I even used the actual card board from the package too.. and guess what... it was from Cuttlebug supplies... of course..
Now I also used my new Embossing Plus folders.. and painted the paper with my Twinkling H20's and that is the only thing other than the brads that I used for this project... Oh yes... I did use a lot of tools, like an ice pick, tried my Japanese book drill and it was going to get ruined... so the ice pick really did a lot better job... I used my Fiskars paper trimmer with the blade for scoring... as when you try to do this type of scoring on a scoring pad it slips and slides all over the place...
That was it.. So I decided that I was going to use it to keep all my left over flowers in... that is just perfect..
I love it... and it will look nice on my messy workshop space... but that is okay.. .we all need some class in our lives all the time...
Here is the front view of the box... and the side is last... What do you think??? An A plus...
I love it...
And it is all recycled material, with the exception of the two pieces of cardstock that I used for the embossing plus folders...
Love it. Hope you enjoyed this... and thanks for stopping by... please join in our Challenge this week... we would love to have you there.. Love, Light and Peace...Bonnie
Today I am going to for fill another promise... I am going to show you another way to use the corner punch... if you didn't do the first tutorial on corner punching I would suggest that you try that one first... but you be the judge on that... just hope you can understand this.. I had quite a few gals leave comments and also write to me that they loved it... so I hope that this one will do the same.. Please let me know... Thanks... My e-mail address is bongem@earthlink.net so you can drop me a line there too. Thanks..
Okay.. .I made a few cards using the punched strips... so that you can see how I use them... So I am not going to go into details about the cards.. just enjoy them... but look at the punching... that is what we are going to focus on NOW!!!
Love that Cuttlebug Pumpkin... do you have it... drag it on out... Fall is on the way..
Okay... you will need 3"x8" strip of paper... A corner punch A pair of scissor... ( long is better.. you need to cut straight across ... and the length helps.. )
1. Start off by punching in the center as shown..
2. It will look like this (more in focus) when punched..
3. Now with your scissor... cut across in the direction of the punch... These words might not be the right ones... but look at this picture and put your scissors in the 'slit' that the punch made... and cut across...
4. It should look like this..
5. Do it again to the other side... and you should have this shape..
6. Now punch lining up the edge of the paper... as we did in the other medallion... NOTE: Each punch is so very different.. due to the design etc... so you have to make adjustments with each one... With this one... you have go into the punched area to make the three punches...
7. It should look like this when done..
8. Now do the other side... lining up again the same as much as possible as you did the other side... That is really the trick to this whole thing... what you do one side.. .you have to do as exactly as possible on the other side..
9. I did have to overlap with this punch.. but with most you don't have to... just play it by ear... this is after all only a 3X8 piece of paper... not the end of the world... start over if you make a mistake... Trim off the mistake and start again... as you can make this 'strip' any length you desire... if you notice in the cards above... some of mine are only a couple of punches... while others are longer...
10... It should now look like this..
11. Now we are going to go the length desired.. you have to line up the punch with the previously punched area... if you look very closely at this picture, you will see the tiny little black area over in the far lower section of the punch....that is from the last punch.. line it up... and punch going down the length of the strip..
12... Like this..
13.. Continue down the length as far as you want to... but leave enough room to finish this off..
14. When you have come to the end of desired length... again CUT THE PAPER in the direction of the slit...
15. It will look like this..
16. Now you are going to again line up the edge of the paper... and also using good judgment punch the end punch... If you will notice... my paper didn't quite line up... but I had more than enough room to straighten out the punch.. .
17. Then start down the other side... lining up as closely as you did on the other side..
18... The first punch going down the other side..
19... Punching down the side
20... Final punch... all lined up and making sure that I am good on both sides now.. . as this will make it look even..
21... Finished!!!!
One thing to remember... Practice makes perfect... Keep on trying.. and then try again..
I have done a few with other punches... just so you can see them... sometimes when you follow the punching it makes it easier..
I hope that you have enjoyed this tutorial... I love these on cards, bookmarks, scrapbook pages, gift tags... all kinds of projects... so cute and versatile in so many ways....
Have a wonderful day... Don't forget to visit my store... TOYZ 4 PAPER More coming on all the time... so check often.. I live... I create.... I am... Love, Light and Peace....Bonnie
What do you do when you have no internet connection???
MAKE CARDS What else...
Well I did do a few other things... but you get the idea...
Not having a connection for a few days... was really driving me crazy for many reasons...
#1... No e-mails
#2.... Didn't know what everyone was doing???
#3. Blog..??? What was going on??
#4. Orders to fill.??? Hopefully no one will get upset...
#5. AND THE MOST FRUSTRATING!!!!
I had decided to do the Splitcoast Challenge of DARE TO GET DIRTY!!!
I had just completed the CARDS!!!! And was waiting to see who the Queens were going to be...
And EDNA was making everyone wait... UGH!!!
Oh well.. I will check in the morning and see who the winners are...
In the morning... NO CONNECTION...
UGH!!!
So I waited until today 3 days longer... to see who the winners were...
And low and behold...
GUESS WHAT???
I was one of the 12 Queens... WOW
I was really shocked...
And prizes plus...
I am so very excited...
Can hardly wait to get them!!!
I will take a picture and let you see all the goodies..
So sometimes I guess it does pay to be patient!!!
WOW... love it..
So in between all this anxious stuff... I did gather up some things... and make some cards to share with y'all... The one up at the top.. .
5.5 X 8.5 inches... a huge card... but I needed it for the paper, for the punched area... and also for all the flowers... Pendants, and Cuttlebug things... love them all.. Navy was screaming at me.. an old time use to be #1 color for me...
So I had fun... and of course my daisies... love them..
I will show you how to create these punched papers... I promise..
Okay... I had a few friends over... Marie and Beverly... and we always get into trouble... so today we made flowers... using the Tim Holtz Die... and I used white paper... and also a really pretty turquoise/teal paper... which you will see next..
I used 4 layers of the largest flower... and three of the medium/large pointed flower... if you have the die, you will know the ones I am taking about...
Rought them up and layer them... it is that easy...
I made a border of Strawberries.. .from a Spellbinder die... and then painted them with H20's... a martha punched area... and then I used a Cuttlebug folder(37-1610 floral screen) to create the background... After creating it, I used Bundled Sage (Ranger) to color the paper... then using a black ink pad, accented the edges...
I tried red ribbon... but the reds clashed... so I used a RUST RIBBON!!!!
Love it...
All the layers... the colors... LOVE IT... Hope you get inspired to create with these colors... Christmas... but not really!!!
Okay... I told you about the teal flower... this is also made with the Tim Holtz die... and the background is also made with a Ranger Embossing folder...
Getting away from those colors... I needed a break for a while... I get hooked on certain colors... and that can be a problem for me.. I will stay in that space forever..
So I broke it with the Yellow, Black and white...
WOW loved doing this one.. .
I used the Embossing Plus folder... Lace Door... 20-00283...
(ADVERTISEMENT TIME)
These folders are not like the 'regular' Cuttlebug folders... they are more costly... and they
CUT AND EMBOSS all with one pass...
Called Embossing Plus Folders...
LOVE THEM...
They are wonderful..
You can also buy these here...
At my store..
TOYZ 4 Paper just click and write and tell me what you desire!!!
Okay... resume the card discription...
and then used the Grand Lace from Spellbinders... and some pretty black and white print from K and Company... the yellow flower I used a Spellbinder to create too.. and cut each of the two flowers in half to create one large HALF flower... !!!
I used the Cuttlebug folder 20-00297 Polka Dots to make the center...
Huge color change... and then..
Had another change..
From yellows.. .to reds again... but this time
TEA BAG FOLDING!!!!
Of course I love tea bag folding.. .have you ever done it..
You start out with 8 squares... all with the same print... and then use the same fold on all 8 pieces.. making sure each one is exactly the same...
I used a split medallion for this card... and also used the center of the Lace Door (20-00283 ) and also a very delicate cut out of an old timey post card..
The back ground... made with Cuttlebug folder 37-1604 Swiss Dot... and then red ink pad to highlight the DOTS!!!!
I also designed the Tea Bag papers... love doing that too.
If you are into Tea Bag folding... write to me.. tell me your interests...
I have tons of Tea BAg CD's... I think I created over 40 a few years ago.. .and am trying to find the time to redo them all.. new cards... etc. etc..
e-mail me at ... bongem@earthlink.net
So many people ask me about me adddress.. .it is not bong em..
it is bon for Bonnie ...
and GEM for my hubby... whose name is Glenn E. McLain
bongem
Okay... another tea bag card... this time I made a wreath... adn also used some K and company papers..
Used the Embossing plus folder... ELEGANT ELLIPSE
20-99254 in yellow.. mounted on black..
Oh yes... a loop punch by Martha... too.
A little more serious...
Christmas card.. One of the more delicate Embossing Plus folders...
Blooming Bouquet 20-00258
And I used one of Martha's punches for the corners...
BUT I used the WREATH from
PRETTIES BY BONNIE...
It is in the Christmas Combination..
It is a digital Image... and that means no postage for shipping... and also the best part...
it is instantly in your hands and ready to use..
But there is one more really neat thing... my favorite yet..
YOU CAN DECIDE ON THE SIZE!!!!
I painted this one with my Twinkling H20's... and cut out the outter edge only..
I used Antique Linen for the background color.. .and love the richness of this card..
I keep on sneaking in a few Christmas cards... as the season is coming up.. and I love to have a lot of cards on hand..
At this time, the program is not allowing me to write under this card... so I will do it up here..
The card underneath here... I was doodling ...and then I cut it out... I used a black bic pen... and also my gold gel pen... and the a Ranger Embossing folder... and a Martha Stewart Flower edge and corner set...
I also used Bundled sage and a lime shade??? can't remember the name... sorry about that..
Anyway... two or three greens for the background..
Inky fingers plus.. love it.
I colored the leaves on my doodle in greens, teal and of course the gold and black.. in real life ... all these cards look entirely different... but you get the idea... and hopefully the energy to go and create some of YOUR OWN...
Love sharing with you.. and hope t hat you enjoy these...
I will be working on a tutorial this week... so that will be next... hold on..
Thanks for coming to visit... I love it..
I live.... I create... I am..
Love, Light and Peace..Bonnie
So very much to tell you... and where to start... Better start with these cards... They are for the Cuttlebug Challenge BE INSPIRED #94... I didn't have internet, (for over 3 days!!!! Talk about withdrawal!!!!!) and had forgotten to up load this prior... oops... so here they finally ARE... The theme was sympathy... As you can sort of tell.. I don't use somber colors at all.. so to me this is a time for flowers... bright colors... love and all kinds of caring things... so my cards might be a little bit different than the next... but that is ME... I have been having fun with the quilled flower templates... love them.... if you want to know more about where to BUY them... you can get them right here... at TOYZ 4 Paper... just click there... and it will take you right there... I have them on hand... and they are so much fun...
Here is a closeup of the flowers... just wanted you to see them... they are so pretty and any color your heart desires is perfect.. you cut, twill and create your own blooms... Of course the back ground on this card is also the paisley folder... love the look
This card is a mixture of all kinds of news... First off... Martha Stewart sells punch SETS... but that doens't mean that you have to use them all as sets... on this square.. I have used two different ones... try it... it is fun.. Then I added a pretty heart... Martha heart..
All on top of D'vine swirls... I painted the paper... and then used my Cuttlebug folder to create the swirls... and then a Ranger ink pad to color the swirls...
I used Liquid Pearls for the center of the flowers for the stamen and accents... love the dimensional looks you can get with the Liquid pearls..
This saying... is a favorite... when I found it... I loved it.. When someone you love becomes a memory The memory becomes a treasure!!! How true is that... so perfect...
On this card I used all kinds of textures to show off my pretty blooms... love making these... and will be doing a tutorial soon.. .more on that later..
A closeup of the Blooms..
My last card... and this one is really a favorite... The background paper... twinkling H20's... and then I used the Blossom Cuttlebug folder... 5x7 size... love it... and then a dark purple ink over it.. My bloom is single... as I added a few butterflies... I went to a memorial service once where everyone was given a brand new butterfly... One that was just born... never flown before... and they were all white... At a certain time, we all let it go... and it was so wonderful.. .the energy was amazing... and there was not a dry eye in the place... and there were quite a few people there... and to see all these butterflies take flight was a sight... lovely...
Okay... I am so very sorry.. .I have had a lot of things happen to me... First off my shoulder froze.. then My whole body turned into ONE HUGE hive... that really itches... yikes... Then my internet didn't work... AT ALL... I can't really tell you which is the worse thing.. .they all are about the same.. I am not quite as red today... and the hives are going down... And I am connected to the internet.. so things are starting to look up...
I will try and get back onto schedule with the tutorials this coming week.. First off one on punching ... and then the one on Quilling... or maybe vise versa... will have to see which one wins...
Have a fun day.. Enjoy... and create something fun... I have a lot of cards to share with you... they are waiting in the side lines... Will start tomorrow..
I live.... I create... I am.... Love, Light and Peace...Bonnie

 Wow... did I ever have fun with this project... !!!
 So I decided that I was going to use it to keep all my left over flowers in... that is just perfect..
 Here is the front view of the box... and the side is last...