Followers

Showing posts with label vintage clip art. Show all posts

Tuesday, September 9, 2014

Fancy and Fun....

This is one of those projects that started to be made a long time ago... and I would add things as they came to me...  the inside of the card started about 5 months ago... and the front of the card was done on Monday... to match a few challenges... 

Which are:

The Shabby Tea Room   Color challenge with birds added

The Kraft Journal  Anything goes... 

Craft Hoarders Anonymous   Flowers that are hoarded...  

I have to tell you something also that is very special to me... I WON another challenge at the KRAFT JOURNAL... and also won a $15.oo gift shopping spree in their store... wonder feelings from this in all ways...  WHAT A GREAT HONOR... thank you all for the vote of love you have given to my work and play...  I cherish the feelings .  

okay... 

Now I know you are waiting to see this all.. and so here it is... 

BIRDS and LACE  

 
Front of the card
I was playing with my Tapestry stamps and made a wreath...  love these little peg stamps... as you can create so very much with them...  I added the wreath onto a background of stenciled goodness and fun using TH gothic stencil and textured paste... fun galore... and then colored some of it with a baby wipe!!! 
Of course I love MS lace makers... my paper punches... and since my studio has all been organized again... I have all my dies and punches in one location... so it is so convenient to pull out what I need to play with to create fun and a mess in my studio... all over the place.   

 
Do you see the little bird tucked into the next among the flowers... she is resting... and having a litter of babies.. 
 
The flowers were made from colored coffee filters... and the leaves a drew, cut out and added liquid pearl (gold) as accents on the leaves... 
 
You can see the tapestry stamping a little clearer on this picture...  each leaf and cluster is a separate stamp... so this is a lot of stamping...  and a lot of fun to me... 

 
Moving back a little... 

 
Getting ready to open the card up....... 

 
The inside of the card... 
 
Each section I will talk about below... 

 
Starting at the back.. a paper with MS lace all around the edges, then a layer of Anna Griffin paper... and then a section that creates the folds in this card...  and I made it into a pocket...
 
Swiss dotted (embossed paper) on the front of the pocket... 
Snails, and little fairy on a mushroom... 

 
The tag... with a vintage rose clip art fussy cutted... 

 
Tea Bag folding.. I love tea bag folding... and this is called the Celtic Knot... a little wreath with some tissue paper flowers... 

 
Ahhhh the big old fluffy bird with a fairy riding on her back...  I love this vintage clip art... so very fun and wish I was a fairy at times and could jump on a birds back for a nice breezy ride around the country side... wouldn't you like to do that too???
WHAT FUN would that be??

 
The last section is a fairy named Luna moth... she is so beautiful... I had to use her here... 


Another very special fold...  and so very small ... I really had to work at this folded flower... 

 
There she is in all her glory... 
 
Well there you have it... my card of love
 
Love of PINK
Love of BIRDS.
Love of FAIRIES
Love of LACE
LOVE!
 
Hope you have something to create that you LOVE ...  I certainly have LOVED making this card and also sharing it with ya'll... 
 
Hope you have a fun day... and enjoy creating something special... Thanks for stopping by for a visit...
Love, Light and Peace...Bonnie
    

Wednesday, August 6, 2014

Vintage Travel with Frilly and Funkie

Well I had to create some more things... and also wanted to show you the little book I had created for the little blue suitcase...  so I have to show you these two things... 

This week on Frilly and Funkie Challenge... it is VINTAGE TRAVEL... so I again had a lot of fun doing more things... 

 
This is a tiny little book... only 2 X 2.5 inches... and I used a sizzix die cut for the little folders... tiny little book... and I had so very much fun making it... 
 
the cover is paper I made using my distress inks and water... love doing that... then I used some texture paste to make the seahorse...
Oh the stencil for that... EVERY die cut you own is a stencil maker... so I used a Cuttlebug die of this seahorse... how cute is that... 
added some pearls for bubbles and LOVE IT.. 

I really dont' like to throw too much away... and these were 1/2 inch and smaller  pieces of paper and I wove them to create the inside of this little book... and another texture paste seahorse on the inside...  with more pearls... 
 
All the paper on the inside were from a Graphic 45 pad on Sea... can't remember the name ... but I am sure if you are into Graphic 45 you know the name...  (sometimes I can't remember the names of things to save my life... and I am quite far from my studio right now... so sorry) 


I made little pickets to put some pictures of your vacation into... and also some cute little tags to adorn them too.. 

 
I used Faded jean Distress ink on all the folders.. and some of the papers as you can see here I also made with distress inks and water. 

Adding things like sand dollars, special netting tapes.. 


some star fish... and more fancy papers... and those little children are so very precious... had to add them... 

 
In between all these pages are graphic 45 paper that you can add two or more pictures to... so this little book will hold a lot and still fit into that little suitcase... the smallest one of all of them... 

 
A little pocket and also lots of space for writing and journaling...  all about the trip and traveling... 
 
Now I also did a few ATC's for you to see... 
This first one is a picture of my Mom... when she was 3... she just passed away this February... and she was 94... so she lived a very long happy life...  so this picture is a little vintage... at least I would call it vintage... check out that car...


Another vintage family picture... of my grandmother a year after she graduated from college... she and a few of her friends went to Europe for a summer vacation... wow... nice huh???
 
She is the one in the back... she might look tall... but I bet she was standing on a trunk... LOL...  the little tag says... 

I never seen such wild wimin... in my life... 
 
I don't know where I got that... but I had to use it... that was a wild trip back then for three women to take ALONE!!!! 
 
It was in the late 1800's... VINTAGE...


Just some old clip art but fun... 

 
Another old clip art on a piece of an old map... 
 
So I did have more fun with this theme... hope you will join in on this challenge and make something really wild too...
 
There are some really nice entries... please check them out...
 
Thanks for stopping by for a visit... and see you soon... I have been working on some special pieces that are not finished yet... hoping to have them done soon.. .
 
Love, Light and Peace...Bonnie 

Craft Hoarders ANONYMOUS!!!!

This week in the challenge at CRAFT HOARDERS ANONYMOUS they ask that we UP CYCLE...  Not a problem with that here... as I have been a recycler for years... we use to have a recycling company called the Crystal Unicorn... loved doing that business... 

Anyway... I had to go back to my favorite thing to Recycle... or up Cycle...  and that was bottles... oh I love bottles... all colors, all shapes, tall, short, tiny etc etc...  so I have a few here to show you what I did with these... I have been waiting for a challenge that I could do this project... so I was sort of ready...  just had to gather up a few things... (which actually took longer than anything...) 


I had bought some organic rice vinegar and it came in this great bottle... and so I bought two...  LOL.. for this project... and also a 24 hour pickle jar.. .LOL... but that is another subject matter...
 
So this is what I did..  She is so sweet... I just might have to keep these myself??? not really sure though... 


On the bottom, I glued some smooth glass pebbles...  to give this bottle a little more height... 

 
This is not a good picture... not really sure how it got on here... but you can sort of see the front... 

Above that I have a beautiful vintage face... and I added some golden wings...  I glue her onto sheet music... 

 
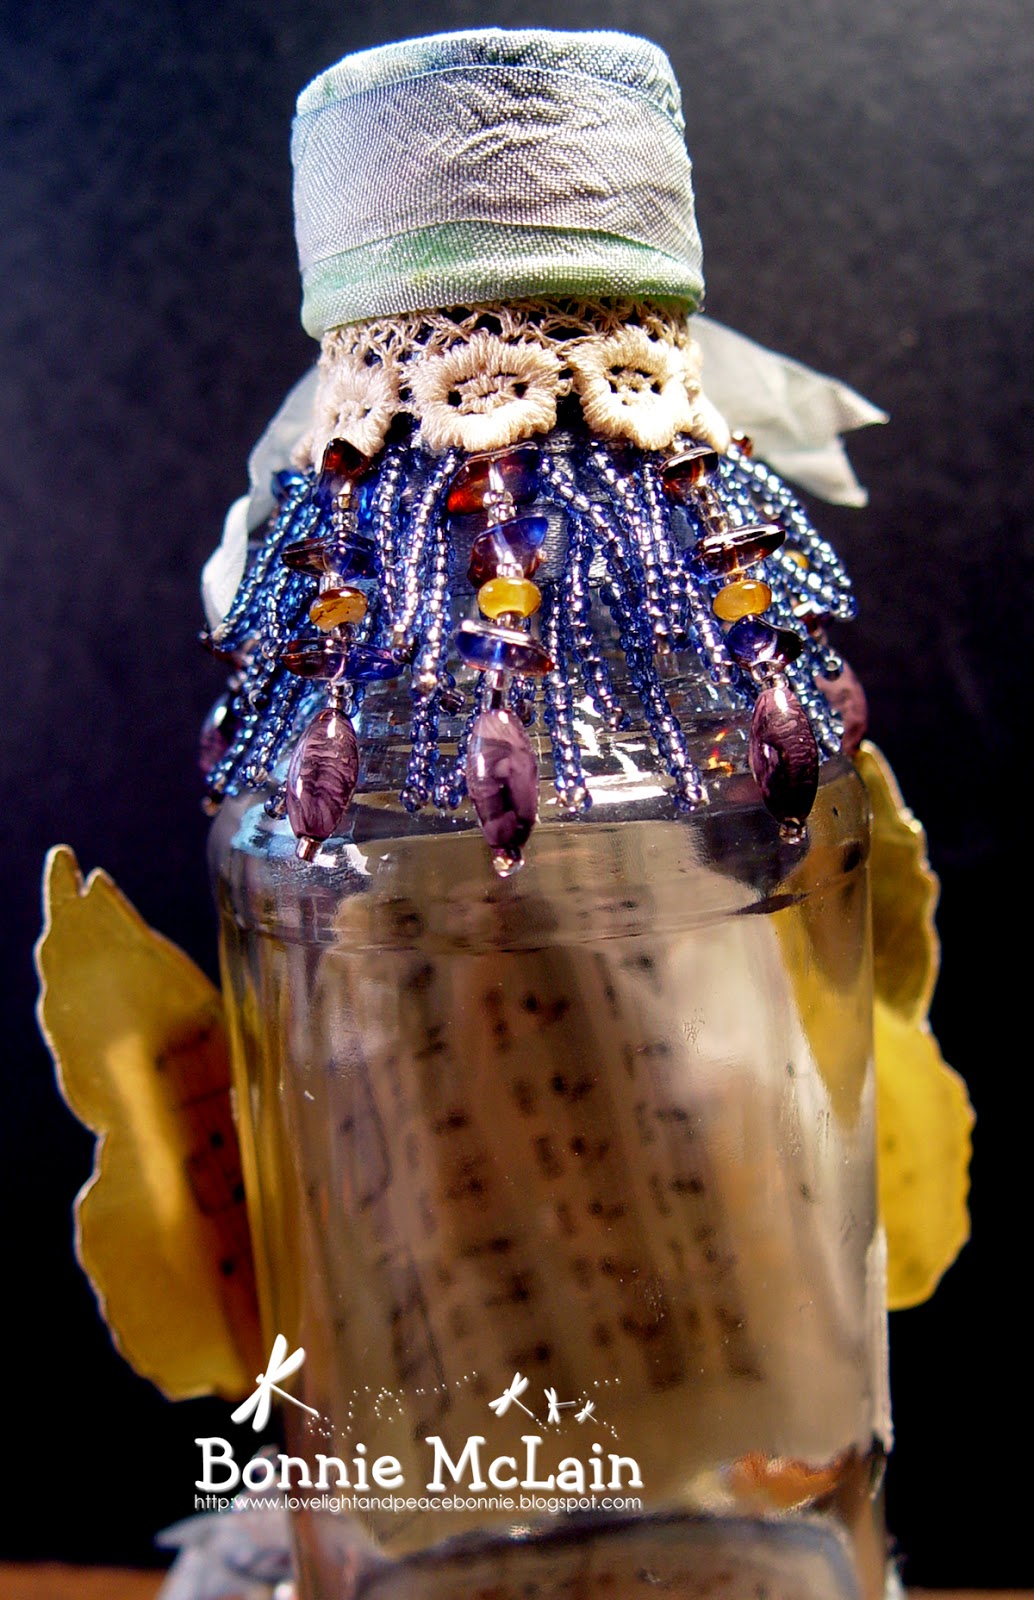
The caps are the hardest for me... but this one I glued seam binding that I had dyed blue onto the cap... it does come off... as I am going to use these bottles, if I keep them for some of my paper beads.. .I have to have a good reason to keep them... LOL.. 
 
Under the cap, I glue rows and rows of beaded ribbons... and then put a little butterfly there too... 

I used some old Cluny lace and then put some seam binding ribbon and some jute over it... and then added a few bows and some of my favorite little flowers... I have to make some more of those... I think I made 100 and I am down to almost 20... need to make more...  A friend of mine... Marie Berquist gave me a little package of these little net butterflies a long long time ago... do you remember Marie??? Well I am finally using a few of them on here...  they are so pretty... with a rhinestone in the center for the body... 

 
I took a picture of the back, so you could see the rows of beads I put on there...

 
The other side of the bottle... 
 
I really love this one... and then I started to play with another one... I really was on a roll... so why stop...  LOL.. having fun is why I do this... and I was waist deep in stuff and couldn't move... so I better make a few more, prior to cleaning up...  (so I could move) 

 
I love pinks... so I had to make a pink one too...
I really got a little bit better at doing this also... you have to make a few prior to really knowing what you are doing... LOL..

 
down at the bottom, I attached some vintage lace...  I bought this over 50 years ago... and it was antique then... so I think it is really vintage... LOL..  I put pearls in the center of each flower... and then moved on to attaching the picture.. 

 
How elegant is this picture?? I love it... so very pretty... been wanting to use it for a long time... FINALLY...

 
The lid on this bottle took me the longest ever time...  I first off drilled a tiny hole in the top, so I could put a fancy knob on the top of the cap... then I covered the cap with copper tape... it worked perfectly... 
 
I added some touches of lace, pearls, bows... and just was having a grand old time...

I loved putting the pearls onto the bottle... 

 
And cutting out dragonflies and adding more bows.. 


and a little chic a dee or tiny blue bird... just so cute... 
 
I love this bottle...  and I think maybe I will put them into the back bathroom... they will look really pretty there..  but I will keep them in my studio for a while... I love them.. 
 
Okay.. these were some fun ones...


That is a picture of my best friend and Me...  I am on the right... as you are looking at it...  Betsy and I lived nest door to each other and I am presently looking for her...  her name growing up was Betsy Sluyter... cant' seem to find her...  miss her a whole lot.. 

 
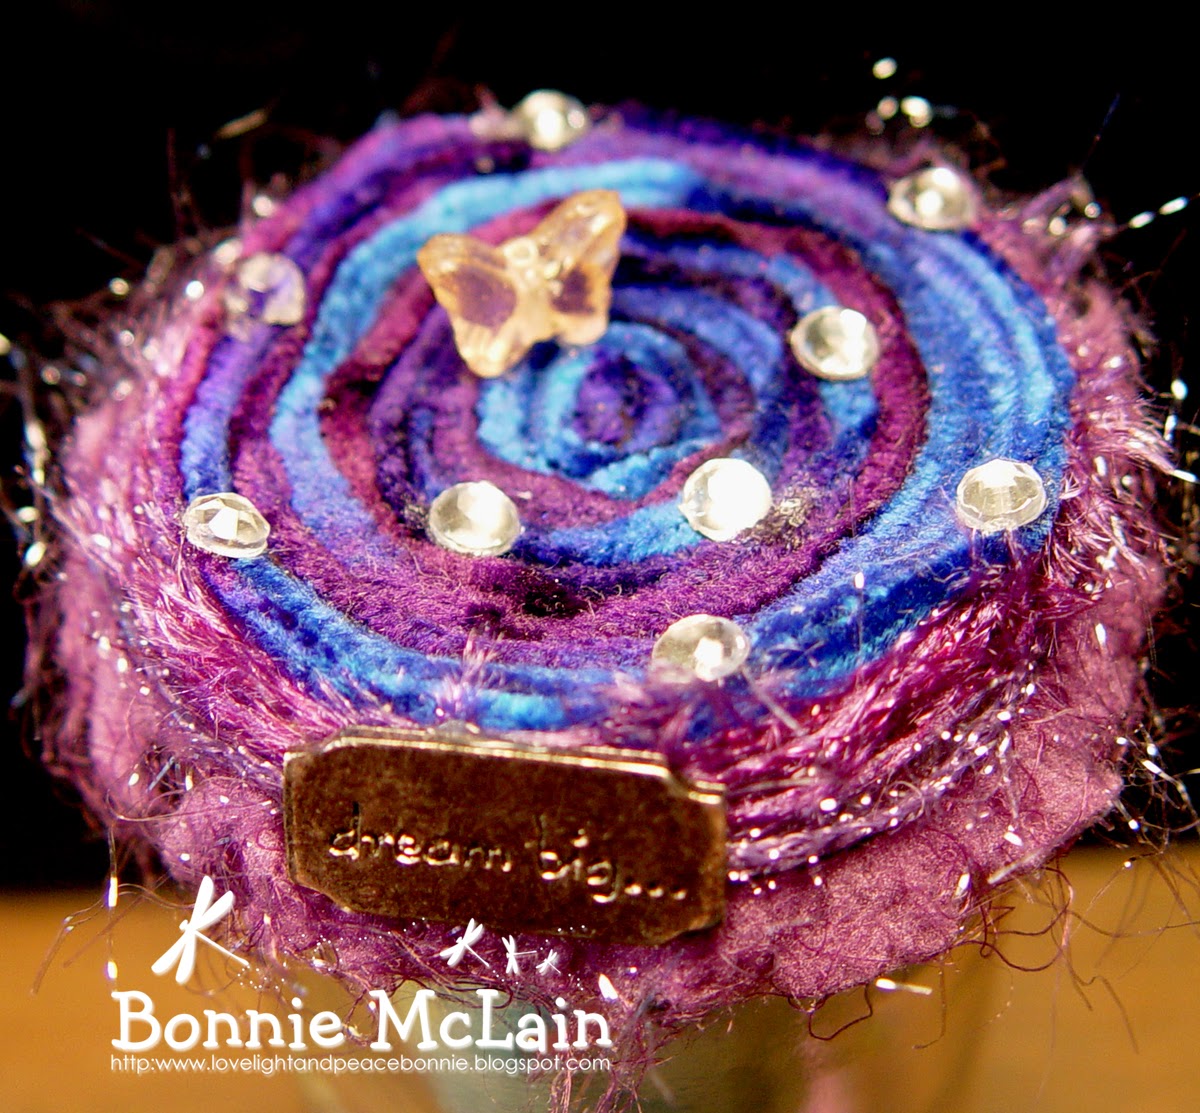
This is the cap.. I put glue all over it and then put fiber all down in circles...  and the tag that says ... DREAM BIG...  we did..
the little butterfly is that I am hoping that she finds her way back to me... 

 
This jar is about 2.5 inches...  and I wanted to make it a SNOW jar... you know the kind I mean... but I didn't have the right equipment... but I DID...
I punched snowflakes out... and put them into the bottom of this jar... and then worked at putting some pictures of me and my Dad ... we use to love to play in the snow...  when you turn it upside down... it snows... LOL.. what fun.. 

 
Dad and Me... those are his shirt buttons... in the day you use to save buttons... as they cost a lot... have to priced them today.. .I am starting to save them again...(actually I have always saved them... just thought it sounded better that I was going to START to save them.. .)   Thread is up to $3.50 a spool... outrageous... 
 
Oh well..  enough of that...
Hope you have enjoyed my bottle display...
Please go by Craft Hoarders Anonymous and see what the other crafters have created also... usually there are some really GREAT creations going on there...  and the design team is really GREAT too...  check it out...   
 
The top two are about 8 inches tall.. and the other one with my friend and I inside is about 3 inches tall.. .so I did use small bottles and jars... I have a few octagon ones too... a huge stash of them... trying to think of what to do with them.. something really special.. 
 
Hope you have had a really nice day... and thanks again for all of you who leave such wonderful comments...  I really appreciate it greatly...
 
Thanks also for stopping by for a visit... 
Love, Light and Peace...Bonnie 


Monday, May 5, 2014

Yellow Flowers


Yellow Flowers with Butterfly was a card that I made for a Tea Bag Class… this new medallion is one from Tiny Van Plaas’s newest book… love it… 


I used a Martha Stewart corner/border punch that is a deep one… so that it would fit onto this 6x6 card…  I found this pretty yellow flower print on Pinterest… and so I printed it a few times to use as a back ground for a few cards…. This one I cut the flowers out.. and then put them onto a Spellbinder background which I had used my new little mini Distress ink Cubes along with the round blending tool…  which makes a huge difference.  You get no rough edges… love it..


The rest…  well you understand it all… if not, please feel free to write to me… I will give you more details… 


Hope you have a wonderful day… and create something that is pretty and fun… 

Thanks for stopping by for a visit and I will see you tomorrow with another card using the same flowers… done a little bit differently… 


Love, Light and Peace…Bonnie 

Friday, May 2, 2014

Violettes


Violettes….


 A special background paper…  I made it from white cardstock with a few colors from Distress Stains, Viva Gold, water, and of course some specially mixed up inks that I love to use…  (I use a little bit of this color… and a little bit of another color… some perfect pearls, and now I have a very special ink… that is all mine..  ) 


I cut out a corner/border background… but this time, I added another corner punching to the inside piece… love it…  gives it a more lacey look… what do you think??? 


A little label from a vintage bottle… and them this wonderful medallion… as you can see I highlighted the medallion with the Viva gold too… love that stuff… put some on your finger and it goes any place you desire…  wow… add a little water and it mixes with your inks, paints and papers… what a great thing… and it comes in a lot of colors… 


Hope you are enjoying the weather…  should be a nice week-end here…  hoping to play a lot tomorrow… and also will be doing the Compendium of curiosities 3 challenge…  if you are interested in parting of this challenge please join in… there are all kinds of prizes from Tim Holtz and Mario… along with two great sponsors…  what fun…  the challenges are all coming from Tim’s newest book… another fun thing to learn from… hope to see you tomorrow…  and thanks so very much for stopping in today…
 
Love, Light and Peace….Bonnie 

Thursday, May 1, 2014

Using clip art

Using clip ART in my mind has to be added so that it is pretty... not that it has to be noticed or forgotten about.. just used in a proper way... 


You might not even see the clip art on this card... until you really look at it for a while...  your eye is not drawn to it...  it is part of the over all card...  you most likely see the ribbon and bow first off... because of the color of it... 
 
when you look a little bit more you see the medallion and lastly the clip art around the bow and medallion...  soft and pretty...

 
Opposite with this one...  BOLD... the Clip art stands out... 


Are you getting the idea of clip art... you can use it, in so many different ways... your choice of course...  just fun... 


Some layered punching and then the clip art wrapping around... love that kind of thing with clip art... you can make it MOVE around anything by cutting it out.. 
 
So here are a few examples... hope you will try it and also share...
Please if you ever have any questions, I will certainly try to answer them for you...
 
Have a wonderful day and thanks so very much for stopping by...
 
Love, Light and Peace... Bonnie